8/08/2013

Mug Rug Binding

I made another mug rug so I could take photos of the steps in binding it. 

Since the mug rugs are so small, I wanted to add the binding without mitering the corners. 

I used my trusty helper: 1/4" Water soluble basting tape. I made a quilt as you go log cabin-type piece and trimmed it.


BINDING
First I cut 1-1/2" wide binding strips from scraps.


From those strips I cut the end pieces the lengtht of the short ends of the mug rug. I cut the long edge pieces 2" longer than the length of the mug rug as shown in the photo below. 


I sewed the short ends on the back of the mug rug and then pressed the binding pieces out.


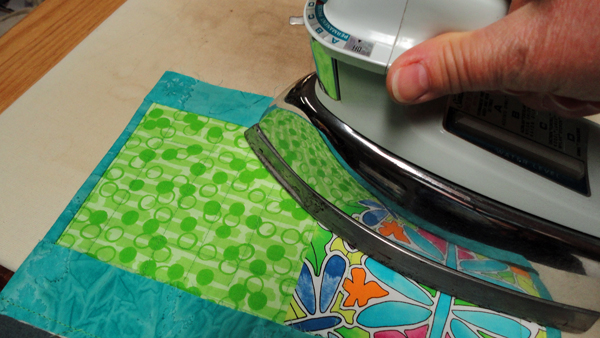
Now working from the front side, I pressed the binding edge to the edge of the mug rug (batting, etc.). I attached a strip of water soluble basting tape to the pressed edge and folded it onto the front of the mug rug (shown below with pins for illustration purposes).


I topstitched the binding from the front.  And on the back, the stitches look like they are part of the quilting, as you can see in the photo above. 


For the long binding piece, I lay it on the back of the mug rug so the raw edges are aligned and 1" overhangs each end of the edge. I then fold those 1" ends around to the front and pin.


I sewed along the entire length of these long sides.


The ends are "turned in" when the binding strip gets folded out from the backing.


I pressed the binding strips away from the backing and turned the piece over to work from the right side. 

You can see how the 1" ends get turned in. I press the binding in half lengthwise so the raw edge touches the raw edge of the mug rug (batting, etc.).


I attach the water soluble basting tape to the folded edge and press it in place and sew the binding from the front, so the bobbin thread finishes off on the back and blends with the quilting. The ends do not have raw edges and line up with the short binding strips. And the mug rug is ready to use!


I can think of some other treats to have with my mug of something, but today I only had a brownie. In fact, a really good brownie recipe is Chai Latte Brownies, which my daughter and I have made for a number of years.  Here is the link to the recipe.  Once I used half and half in the recipe because I wanted to use it up--and I believe the brownies were better.


8/01/2013

One Test Block Done

I finished the paper piecing test block.  I have a few things to tweak on how I construct the blocks to help with the pinning of the intersections so they aren't off as much as I see in this one. But here is my test block put together. I am happy that the size measures 12-1/2" x 12-1/2"!


MUG RUG from LEFTOVERS:

With the leftover pieces that I cut off the paper piecing I placed them on a piece of batting with the idea that I would do "inchies" as described by Angie Padilla on her blog HERE. 

After laying the pieces in a hodge-podge, I placed a piece of very light blue wedding tulle over the pieces on the batting, pinned and took it to my sewing machine. I used a metallic thread with a white/hollographic look to stitch all over the tulle to keep all the pieces in. This is when I decided to make a mug rug. I trimmed the sewn piece into a wedge form. Spray basted the back and added some leftover fabrics for a backing. I sewed some straight lines vertically to hold all the layers together.  Finally binding was added. I will post tomorrow how I did this--it was so easy!

Save your scraps for your own mug rug!


7/31/2013

Paper Piecing for Block Exchange

I signed up to participate in a paper piecing block exchange which Beaquilter posted a few weeks back. It is now closed but she has a good tutorial on the paper piecing of this block. 

Those of us who chose to participate told of our color choices for blocks. I chose bright colors-pink, turquoise, lime, yellow and we are all using the same Kona white for the white section.

I thought I would work on my own blocks to begin with to make sure my machine was working well and to see that the pattern made the correct size block. So far I have 1/4 of my block made.


I am going to work on this block to complete before it gets too late.


7/29/2013

Placemats

I made placemats for my daughter's apartment. She picked the colors and sketched the design. She likes them and they look great on her table. 


I am busy getting my quilting class schedule figured out for September and October. I made a class sample of Exploding Pineapples from Karin Hellaby's book "Sew Simple Pineapple" and I was very pleased with the technique. Unfortunately, I did not take a photo of the quilt before taking it to the store and will have to wait to until I go back to get a photo. But it is cute and was fun to make. 

I am working on a chevron quilt for my daughter. Solid colors and will be quite modern looking. It was her design and color choices. I know she will gently work her way into sewing, but it will be a few more months as she settles in to the new job and apartment. 

Am also in the process of getting ready for the AQS Show in Grand Rapids, Michigan in a few weeks. I am taking a few classes and have to pull together the materials I need. 


7/20/2013

Georgia Bonesteel Trunkshow

In June I went on a Quilters' Bus Trip to The Outerbanks, North Carolina. We did many things over the seven days, including attending the Original Sewing and Quilt Expo in Raleigh, N.C. on June 20. But I was so glad we were able to have Georgia Bonesteel meet with our group for a private trunkshow.

I had seen Georgia on TV shows many years ago with her Lap Quilting Techniques. I have to say it was not something I was interested in attempting. She had so many quilts to show us that she has made over the years; I am sorry I was not a bit more inquisitive about her over the years. She is a lovely lady. She has a new product for quilting pieces called Grid Grip.  It is  an iron on grid paper that is drawn on, cut out, ironed on fabric with the fabric grain and one cuts with a 1/4" seam allowance .

I some photos to share: 

The Folk Art Center is located in Asheville, N.C. on the Blue Ridge Parkway.


Entering the Folk Art Center

Georgia Bonesteel describing one of her many quilts.

Our tour director, Kimberly, presented Georgia with a basket of
items made in Michigan.