9/26/2012


Mid-Week
I have taught two classes at the New Ewe on the past two Saturdays.  The first class was the Folded Flying Geese Placemat class and I am posting a photo of Robin's finished project(s). 


The other class I taught was a Dresden Sunflower.  Robin took that class and here is her wall hanging.  She did a great job.
Here are a few other projects that can be made with the Dresden Flower technique: 


The next class I will be teaching is from the book, "10-Minute Blocks," on October 10. Then on October 15 I will have the first (of many I hope) Building Blocks Club session.  We will be making Log Cabins and variations.
10-Minute Block Quilt Possibility

I entered my Pinwheels and Patches Quilt into an on-line contest at Quilting Gallery.  Friday the voting will open.  Please check it out and vote for my quilt!  

Here is the back of the quilt. I used scraps and pieces that matched the colors of the quilt.  I wanted to use what I had rather than purchase more fabric!


I am looking forward to our daughter coming from Taiwan to visit for 10 days.  Right now we are hoping the typhoon does not delay or stop her plans. 

I have been working on a few more projects.  Last Wednesday I went to Inspirations of Art in Grand Rapids to use the Sweet 16 Handiquilter.  I got 3 smaller quilt tops quilted and will get the bindings on in the next 2 days.  I will add photos when they are done. This is such a great place to work and soak in creative ideas.  I will be taking an ICE DYEING class at the end of October.  I am looking forward to go back more often to work.

I had an offer from Shutterfly for a free 8 x 8 book.  I had quite a few photos of my quilts from the last few years on file for just such an offer.  I put the book together and it came two days ago.  I am quite happy with it.  The only thing I didn't like was that the offers Shutterfly sends via email last for only a few days and I don't always have things ready to do a rush job.  This one worked out well. I also got an offer for free cards. I had to pay for shipping, so each card (a pack of 10) came to about 67 cents each--not bad for Christmas cards. I put a cropped photo of one of my Happy Villages wall hangings on the front, a JOY banner on the inside and a hand-sewn weaving on the back.  I hope the recipients enjoy them. 


9/03/2012

September Has Arrived

September 3, 2012

Here it is almost one month since my last post.  I feel like I have neglected telling anyone who is  interested what I have been doing.  The past few weeks have been pretty exciting. 

I attended the AQS show in Grand Rapids, Michigan, for all 4 days.  I signed up for a number of classes, viewed the quilts on display--a small section each day, checked out the vendors and bought only a few things, met some very nice people and had a total blast. 

The classes I participated in were varied.  Susan Purney-Mark taught 3 of them--Fonts and Fabric, Printing with the Thermofax, and Ball Joints.  I were to discussions about publishing and the business of quilting.  The class on machine quilting leaf designs by Sally Terry was very informative.  And the most exciting was meeting with an editor, showing her my patterns and telling of my pattern ideas.  She said I should submit a proposal, so I am now working each day on that. 

I will be teaching a class this coming Saturday at The New Ewe.  It is a new concept for the store:  The Building Block Club.  Each month participants will learn how to construct one type of block and then examine all the possible uses as well as variations of that block.  A person can come to one, some, or all of the monthly sessions.  This Saturday is the LOG CABIN block.

Today I viewed Barbara Brackman's blog and the Block of the Month she posting for the next 49 weeks.  I will be following the blog and trying to construct the new block each week.  She also has such good information about the Women's Suffrage Movement, which I found out was happening in other countries besides the United States in the early part of the 20th Century.

So tomorrow, I plan to test a few more patterns, sew a block, maybe tidy up an area of my sewing room, and post to this blog.

8/14/2012

August 14, 2012 

Yes, it has been a few weeks since I last posted, but a busy time.  We moved our younger daughter back home after her internship ended in Columbus, OH.  I have been working on organizing my sewing areas!  Yes, plural.  I have found that cluttered areas do detract from my productivity.  

I visited the Small Art from the Heart exhibit today - at The Stream in Newaygo - it is running through September.  The artwork is amazing.  I was so impressed with the detail of some of the work done on these small cards (2.5" x 3"). I found that my yellow bug card had a sticker announcing 2012 Award.  There were a few other cards that had these stickers on them.  I do not know what it means yet, but am sure I will find out soon. 


I will post some finished projects in the next day or two.  (I have been sewing a bit, even amid the clutter!) 

7/30/2012


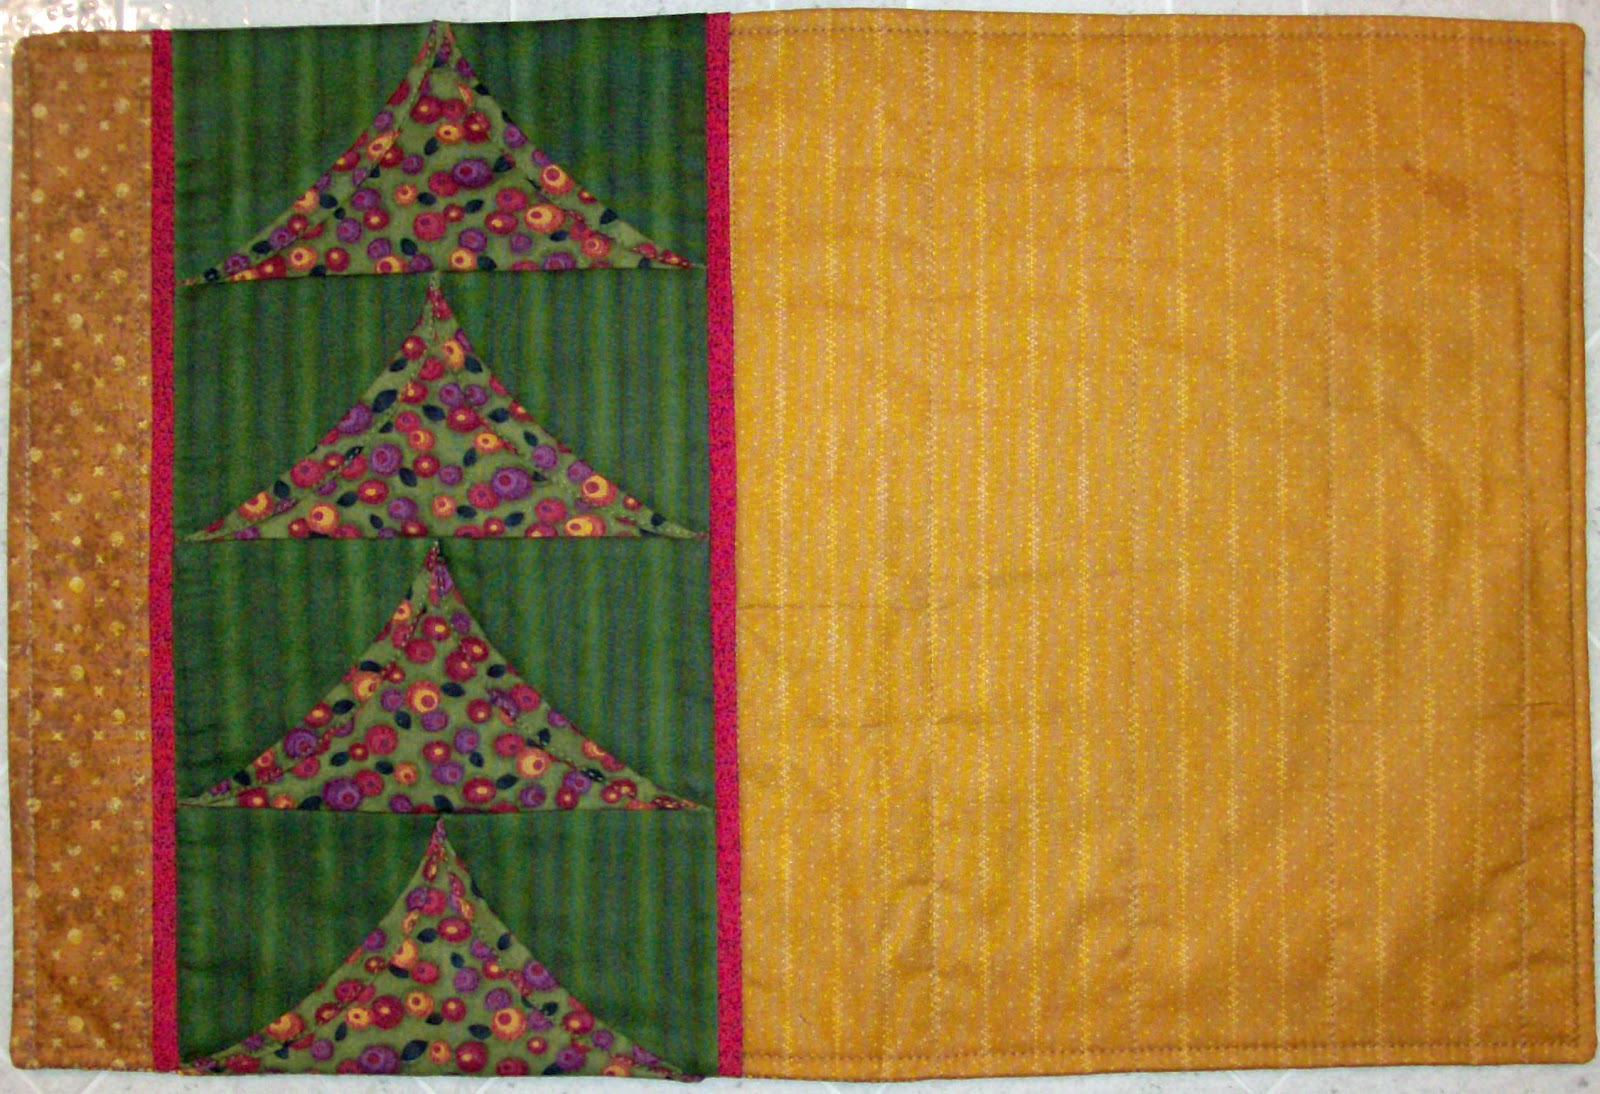
Folded Geese Placemat

These instructions are for ONE placemat. In ( ) are the fabric amounts if you plan to make 4 placemats. 
Use 1/4” seams throughout.
 
Supplies:
 
Main top fabric:  fat ¼   (2/3 yard)
Left Side Bar:     2-1/2” x 12-1/2” (fat 1/4)
Background for geese:  1/8 yard (1/3 yard)
Geese:  1/8 yard (1/3 yard)
Flat piping:  1/8 yard (long ¼ yard cut)
Backing:  fat ¼ (2/3 yard)
Batting:  one piece 20” x 14” (2/3 yard)

Cut:
1 Backing fabric 18-1/2” x 12-1/2”
1 Main top fabric (right side section) 12-1/2” x 10-1/2”
1 Left side section strip 12-1/2” x 2-1/2”
2 Piping (no cording in this piping) 1” x 12-1/2”
Background for geese blocks: 8 pieces 3-1/2” x 3-1/2”
Folded geese pieces: 4 rectangles 6-1/2” x 3-1/2”

Assembly:

Make the flying geese blocks first.  Fold one rectangle in half WST (Wrong Sides Together) with short ends touching. (It will now measure 3-1/2” x 3-1/4”).  Place this folded piece between two background squares so the right sides of each background are touching the folded piece, making sure the raw edges of ALL pieces are aligned.  The folded piece will be 1/4" short of aligning with the raw edges of the background squares.

Diagram at left shows folded piece on bottom background square.   The square at right  is right side up and has to be flipped right side down on top of the folded square.


Sew a 1/4" seam from the corner where all raw edges align, down the edge, ending at the corner below the folded edge of the flying geese piece.  Turn the sewn piece 90ยบ.


Open one background piece flat.  Press seam.  Open the folded section so that bottom corners match and a triangle is formed.  Press flat.  Pin corners in place.  Repeat for 3 more flying geese blocks.  The point of the triangle will be ¼” below the raw edge, this is the space for the seam allowance when sewing the blocks together. Sew the 4 blocks together into a column that measures 6-1/2” x 12-1/2”. 


Fold the two piping strips in half lengthwise with Right Sides Together (RST) and press.  Lay one piping strip on the left side of the flying geese unit so raw edges align and the piping is covering the corners of the triangles.  Place the left side strip over (right side covering) the piping strip.  Pin along the 12-1/2” edge and sew all layers.  Press open so the seams are all under the flying geese side of the piece.

Place the other piping strip over the flying geese unit on the right edge, raw edges aligned.  Place the Main front fabric on top of these pieces so the right side is down.  Pin the long 12-1/2” edge and sew through all layers.  Press open so all raw edges are under the flying geese unit.

The flying geese triangles have a long diagonal bias side which is open.  This can be left open, topstitched down, or you can do as I did:  Roll the bias edges toward the center of the triangles, hold in place with a bit of Roxanne’s Glue Baste It and then topstitch in place.

Quilting the placemat:   I am not working with the backing yet!  I put the top of the placemat on the batting, spray basted it in place, or you can pin it.  I used the walking foot to sew some straight lines down the main fabric piece of the placemat top and the side strip on the left.  I then sewed in the ditch under the 3 top triangles.

Finishing:  Trim the batting to the size of the placemat top.  Place the backing on the placemat top, RST.  Begin sewing at the middle of the main fabric of the placemat, 1/4” around the edges and stopping about 4” from where you began.  Trim the corners so when the piece is turned right sides out they will make a nice point.  After turning it inside out, press all edges and sew the opening closed.  Topstitch around the edges 1/8” or 1/4" from the edge.

Tip:  To help me keep the top and bottom of turned items well aligned so the backing doesn’t show on the front, or vise versa, I dampen my fingers and roll the seams so they are aligned and iron immediately.

I hope you try this project, or change it up a bit with colors or designs.  Happy Sewing! 

7/26/2012

Demo Days

July 26, 2012

Quick Sew Diamonds
Today was the first of two demo days at The New Ewe Yarn and Quilt Shoppe in Newaygo.  I worked all week getting ready to show my quilted ideas.  Today I worked on finishing a few items and made a Folded Flying Geese placemat which will be a class.  I will have a free pattern here on the blog within the week for those of you who may live out of the area and can't take the class.  Be sure to come back to get the pattern!
10 Minute Block QOV
Here are photos of the items I have made for the demo days and upcoming classes:

Sunflower Wallhanging
Joy Banner
Christmas Wreath
Folded Geese Placemat
Christmas Medallion Quilt Top