3/29/2019

3 Week Monster Project

Today was the start of Spring Break for our local school district.
I looked forward to sleeping in just a little longer than I have for the past 3 weeks. Two other ladies and I have been at the high school art room from 8 a.m. til noon guiding 4 classes of teenagers as they sew the monsters they designed.

Most of the students have finished their monsters. Some have just the finishing touches to add. And a few have a bit more than that. Later in April, they will be presented to the 2nd grade students who developed the idea for each particular monster made.

We ladies have had the most wonderful time working with these students. I actually looked forward to the days we worked in the classroom. The 3 of us agree we will help again next year!

I wanted to show a few more photos of some of the monsters. (Wish we had had time to get more photos, but gosh, we were busy.) The photo quality may not be the best. I cropped out the students and tried to increase the size of the jpg.

Thank you so much for visiting. I hope to have more photos after the break.


3/27/2019

My String Quilt Project

Hi! I'm glad you stopped to see my string project for 
Thanks, Carla, for coming up with this great idea!
It was the stimulus I needed to get a new spring project made. 
The string projects that were posted earlier this week have been great.
If you haven't seen them all, the list of all the participants is at the end of my Easter Egg Runner tutorial. 

I had fun working on this Easter Egg table runner. 

I thought you might be interested in how I went about putting this together. 

A pile of bright fabric scraps, strings to be exact. 

Sew the strings together in a pleasing combination.

I sewed a background fabric from off-white fabric strips.

Run off a copy of an egg shape from a child's coloring book or the internet. 
I found mine HERE
Thin fusible interfacing.
Trace the egg shape onto the non-bumpy side of the fusible interfacing.
Cut 1/2" outside of the drawn line of the fusible. 

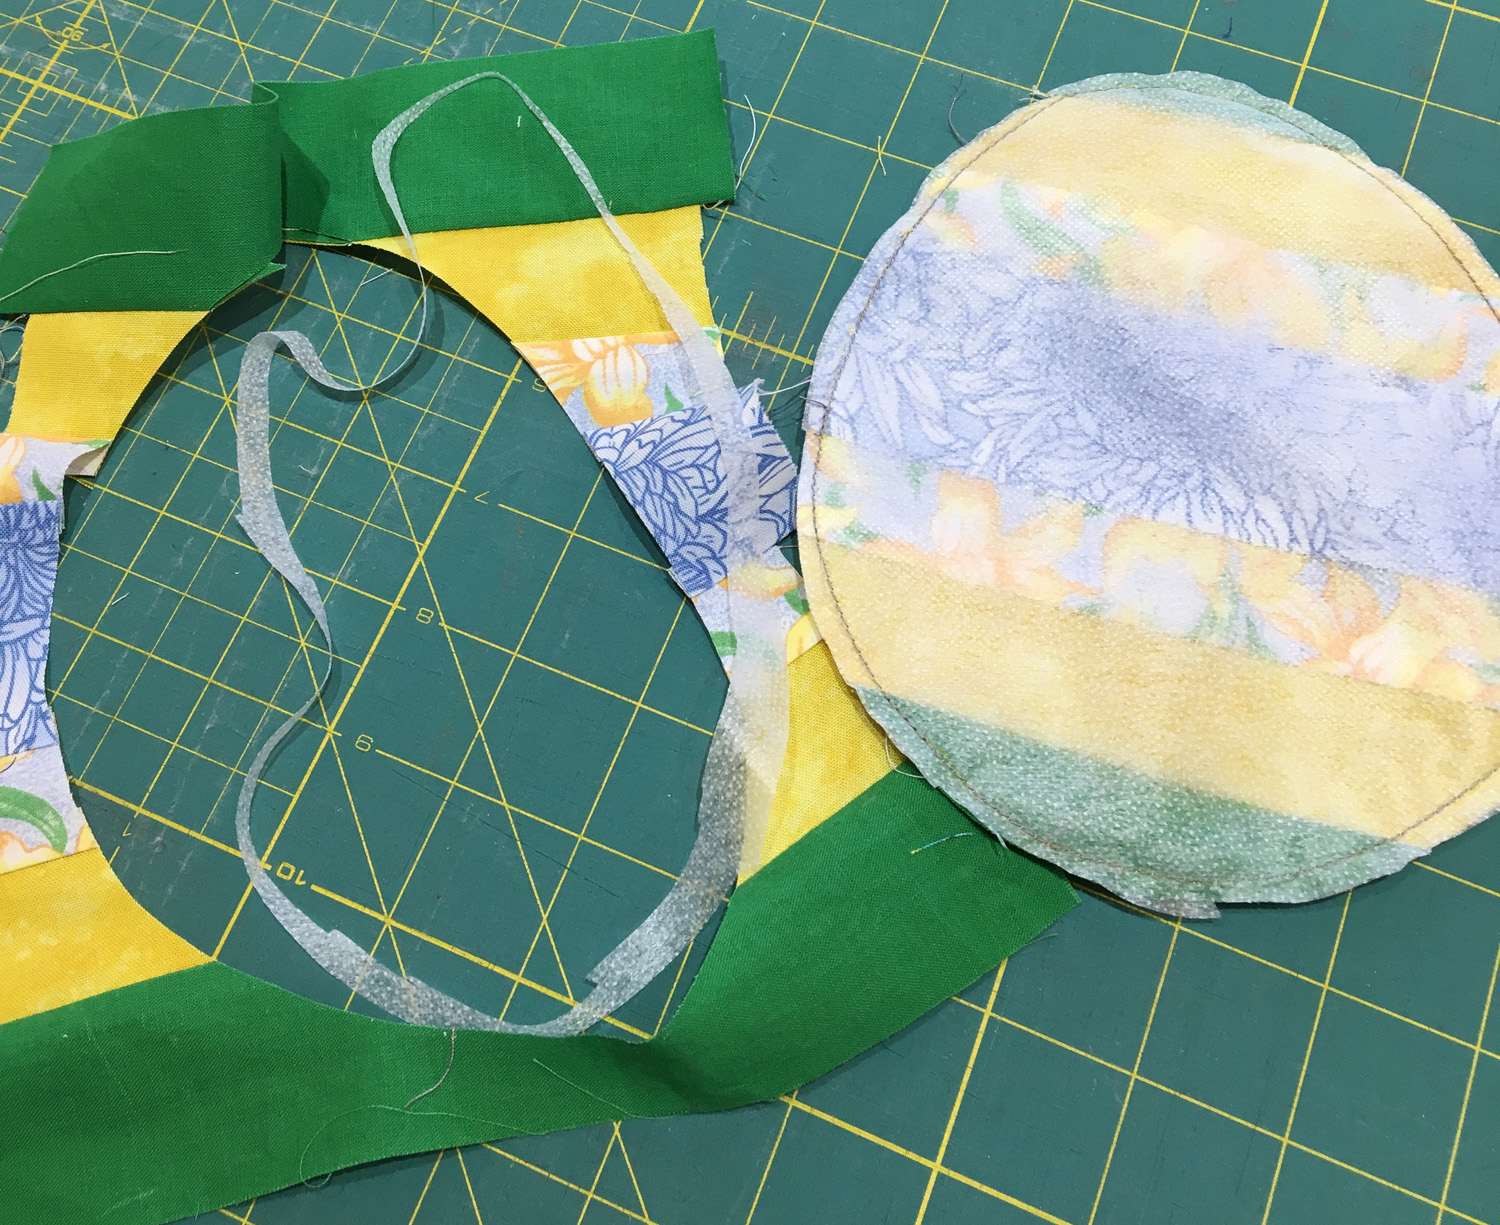
Lay the bumpy side (fusible side) on the right side of the string pieced fabric unit.
NO IRONING! 
Sew on the entire drawn line.

Cut 1/14" outside of the drawn line to form an egg shape. 

Carefully clip a slit in ONLY the fusible interfacing.

Turn the egg right side out. Now the bumpy side of the interfacing is on the outside. 
This will be the backing of the egg and the edges of the egg will be turned under 1/4". 

I use only my fingers to press the edge of the egg and fusible.

See how the edge of the fusible is under the egg fabric?

Lay the egg face up with the fusible touching the right side of the stripped background fabric. 
Press the egg to the background fabric and the fusible will hold it in place.

 Lay a thin piece of batting on the back side of the stripped background, 
under the egg shape that was pressed on.

I used a blanket stitch around the egg shape to hold it and the batting in place. 

 I can see the stitches. 
Cut the excess batting from around the egg. 


Do this for all the eggs you will use on the runner. 
Place the stripped top on another layer of batting and a backing fabric.
Through all layers, machine stipple the stripped background. 
Come up close to the edges of the eggs so a puffy, raised shape is formed (because of the layer of batting that was stitched to the egg in the beginning). 


Bind the runner and enjoy a fun spring table decoration.

Thank you for visiting and reading the tutorial. 
I truly enjoy your comments and I like to reply, if I have a way to contact you. 

Visit all the participants in the All About String Blog Hop.


3/13/2019

Quilting Project this Week

I am participating in the All About Strings Blog Hop
 that Carla is hosting March 25 through March 27. 
 
It looks like this blog hop is going to be inspirational for scrap busting! 
I am almost finished with my project. 

I hope you'll join us each of the four days.
Here's the line up:


The other day I posted about helping in the high school art classes with pattern making and sewing guidance with the Monster Project. I've come home the past two days and sewed a stuffy each evening. Here's what I made. 

The red dog was made with a pattern I have had for a long time and I don't have any information about it. 
The gray cat is a pattern I got from Choly Knight called Kitty Bean Plush. It is the first pattern of hers that I have sewn. It was fun and the directions were clear. I am sure with practice I will get better. 

The other project I am slowly completing is the fabric shower curtain for our remodelled bathroom. It's been a long process because of the odd size: 62"wide x 84"tall. I have only the hem to finish! I'll post a photo when it is completed. 

Thanks for visiting!


3/12/2019

High School Art Classes Sewing


Last week with two other ladies, I started helping in the local high school art classes. For the past few years, the art teacher has the students design and make stuffed monsters. This is the second year we have helped. And, as with anything a person does more than once, each time gets easier and better.

The unit involves all the 2nd grade classes, too. The 2nd graders developed a written description of their monster and drew a picture of it. This information was delivered to the art teacher. The high school art students took one of the students' descriptions and pictures to work on.


They redrew the younger child's picture in a scene as described in the child's written work.


After this is when we adults come into the classroom. We discuss with the classes how to design a sewing pattern from their drawings. We encourage them to ask questions as they work on those patterns. We suggest ways to add appliques or best sew appendages. We show them how to use the sewing machines.


The past week has been rewarding for the 3 of us adult helpers, who have sewn since we were children. And it appears to us that the students are having a great time working on these stuffed monsters, too. And we are looking forward to the next few weeks as they finish up.

3/08/2019

Quilt Con Charity Quilts

When I arrived at Quilt Con the first things I noticed were the charity quilts in the hallway! The colors that were designated to use in these charity quilts are favorites of mine. They were such happy looking quilts. But it wasn't until I entered the exhibit room that I saw even more of these charity quilts! Wow! I have posted a few of my favorites and apologize that I did not take photos of the details regarding the makers or the titles. Such talented and creative quilters!


I wish you a good weekend that includes doing something fun.
I will be sewing!