9/28/2014

Art Prize: a Bit of the Quilting Side

On Saturday I met my daughter and her boyfriend in Grand Rapids so that we could explore some of the Art Prize entries around the city center (approximately 3 miles). The art pieces are displayed inside and outside many venues (hotels, museums, restaurants, businesses, etc.) You can read more about this event HERE

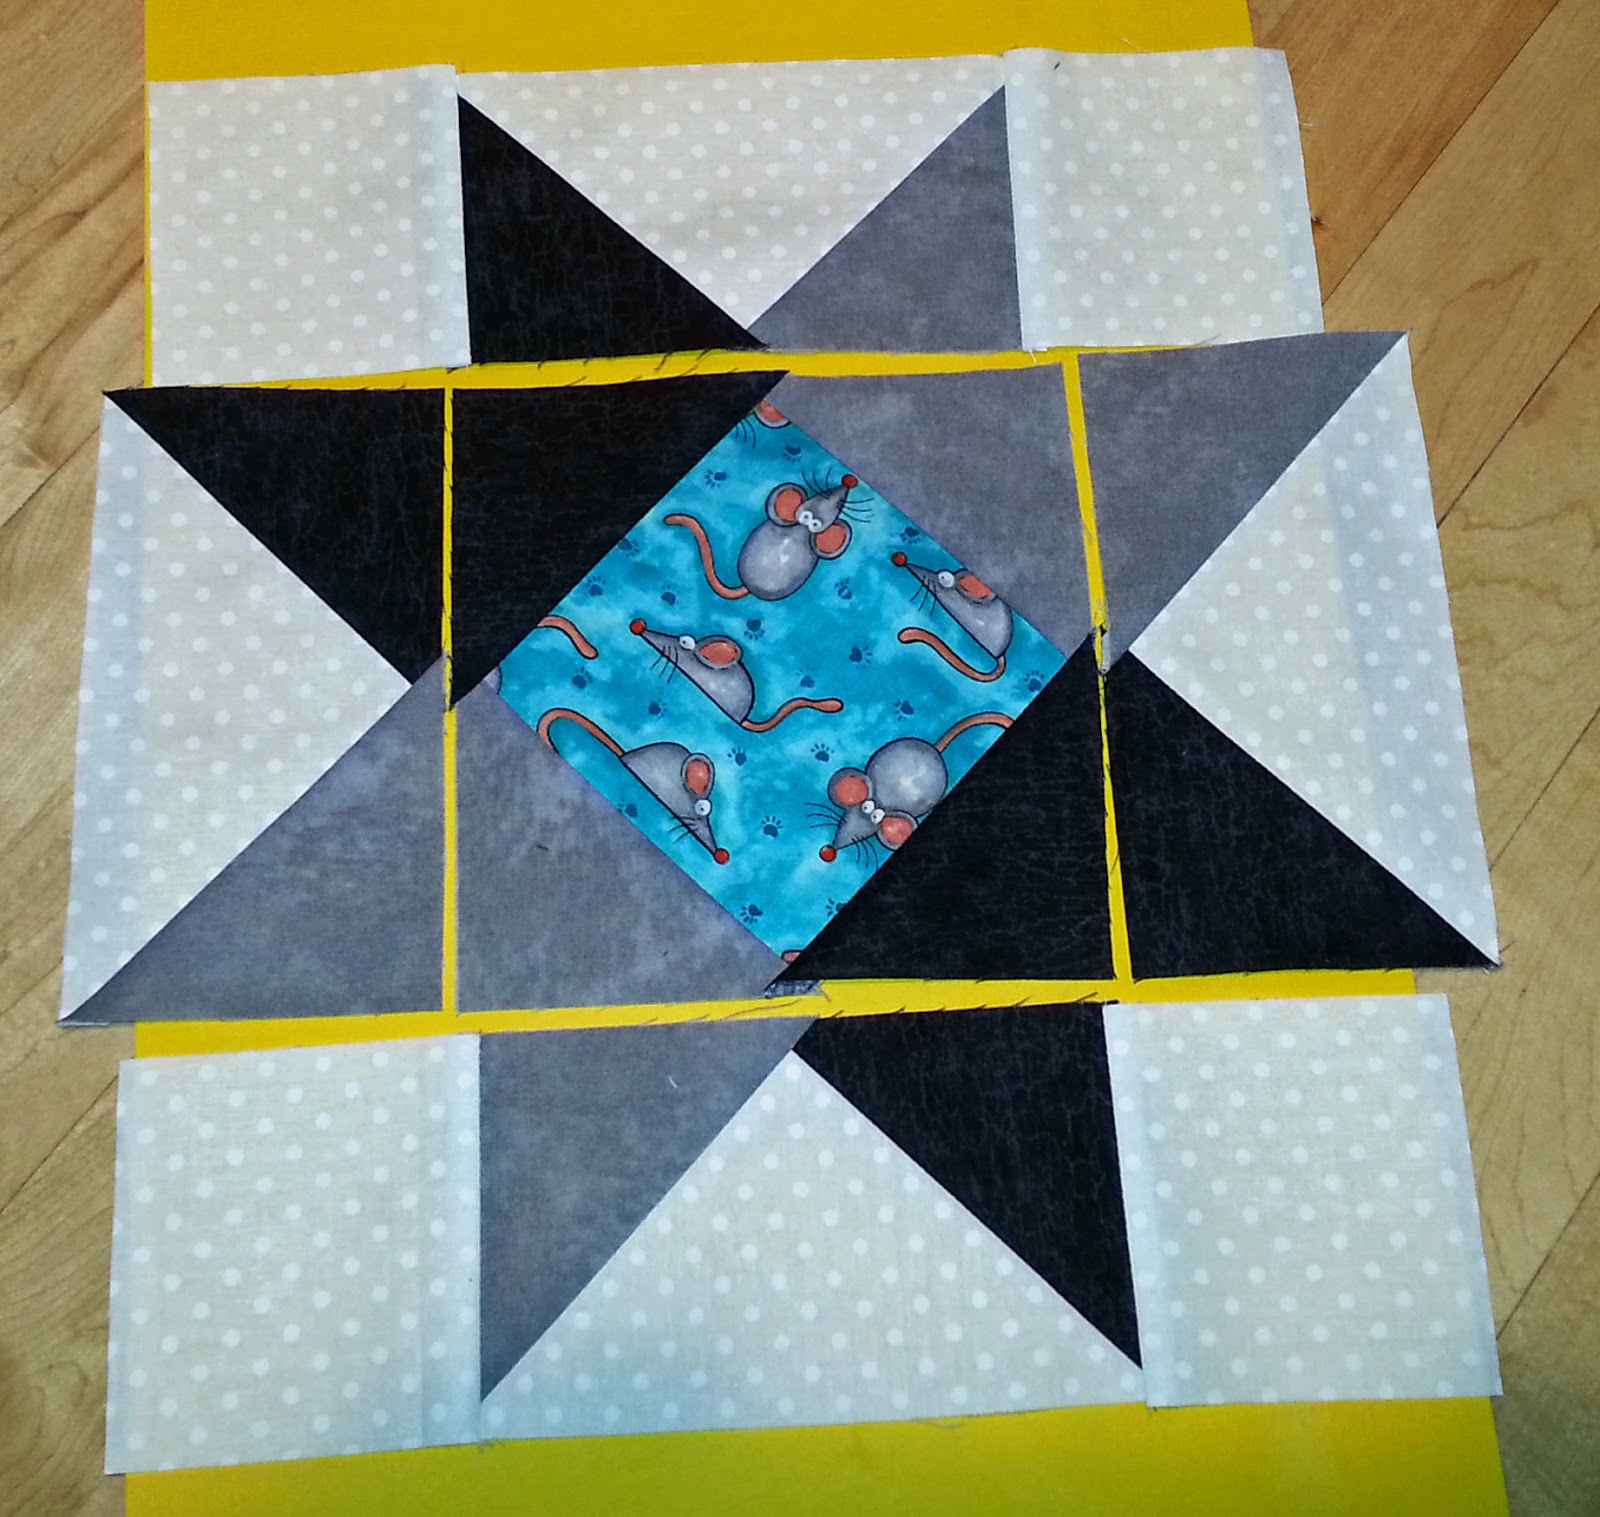
I took photos of some of the quilt-related pieces that we came upon. Please click the links I have included to find out more about the pieces or places I've mentioned in the blog.

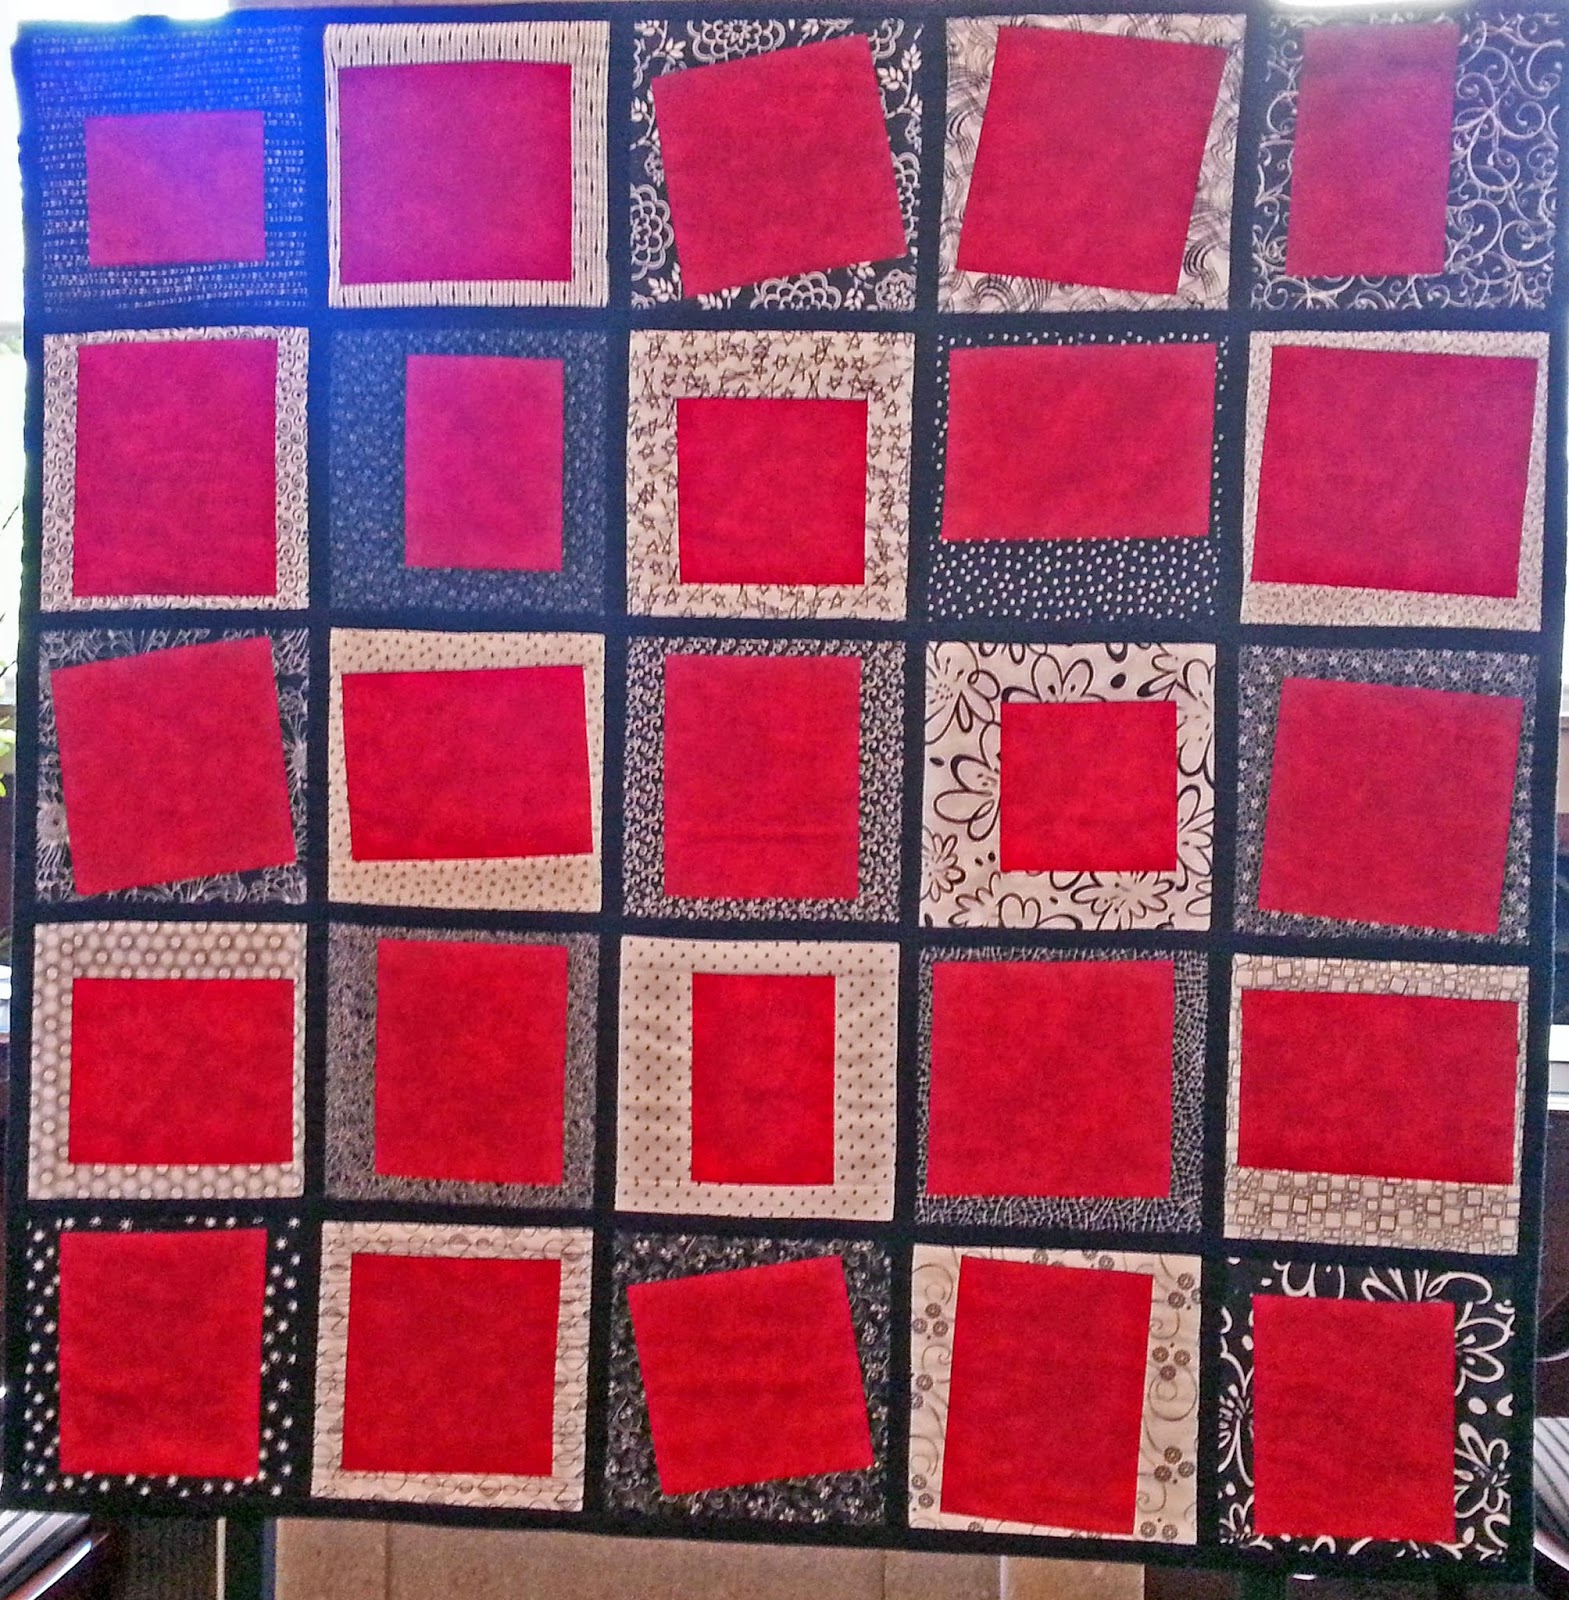
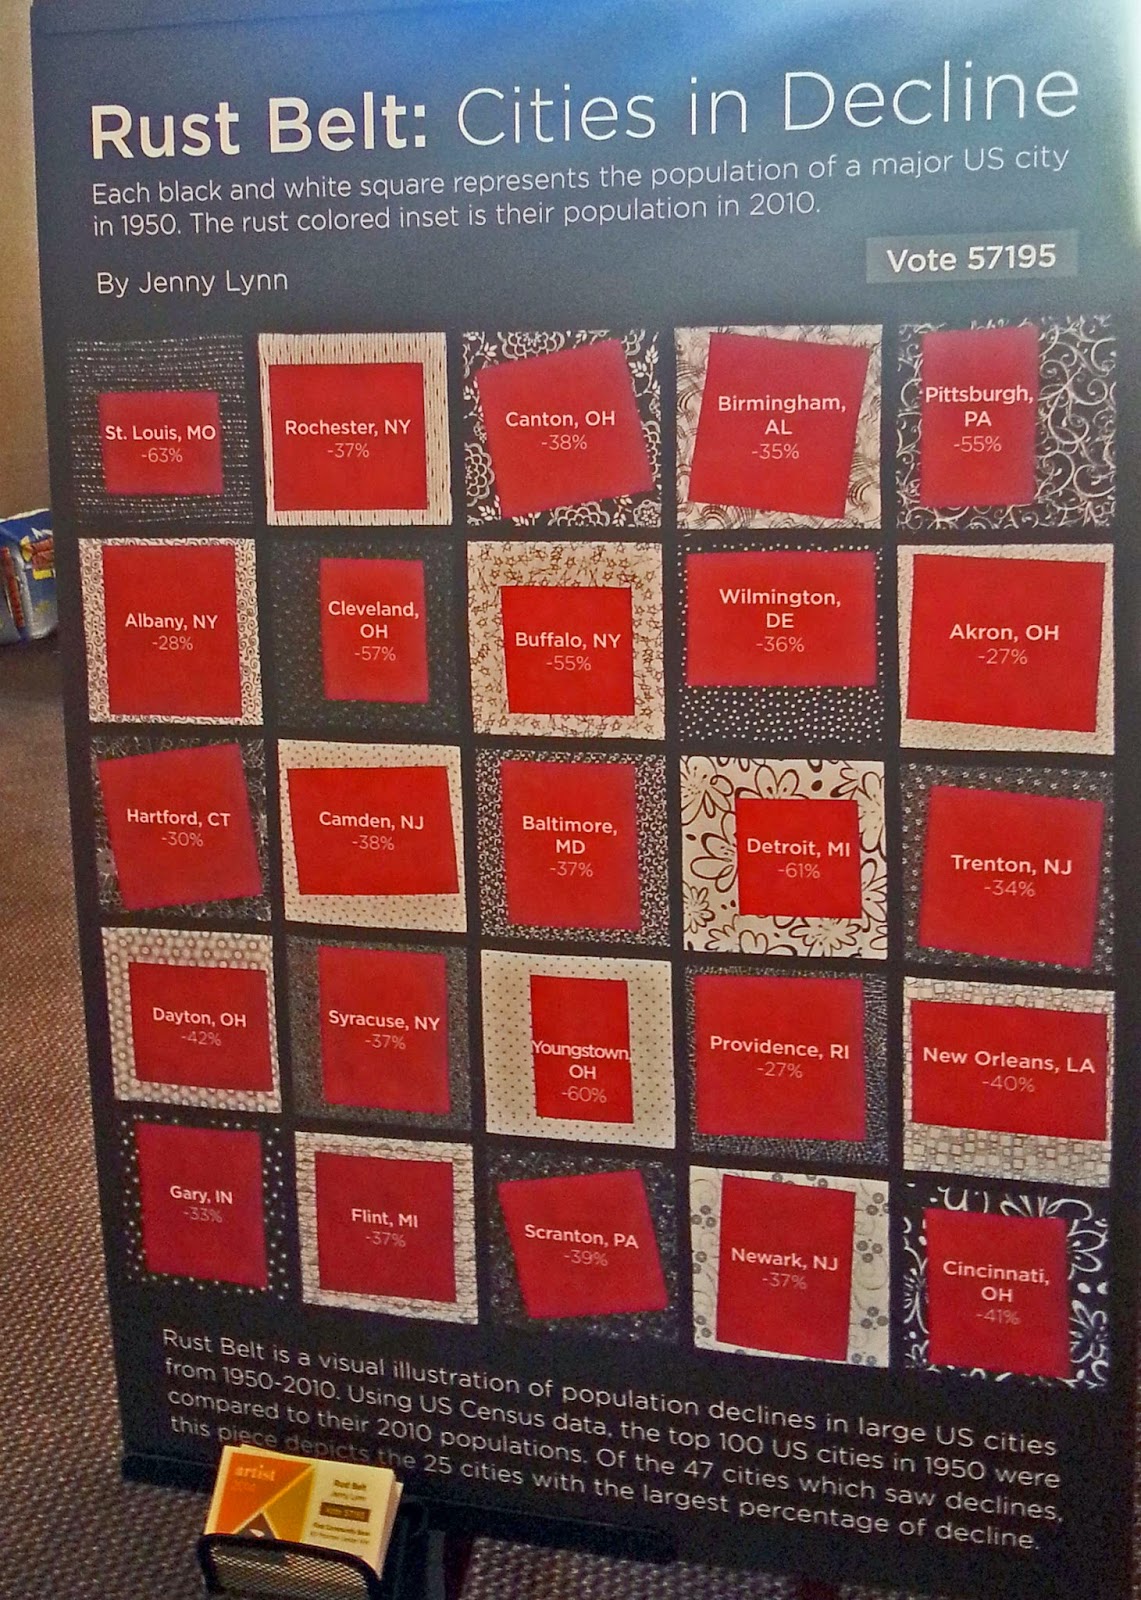
RUST BELT was an interesting quilt by Jenny Lynn which compared the 1950 and 2010 populations of some of America's largest cities and showed decline in all. I like that she used the colors red, black and white. I appreciate that she used math to calculate the difference in size of the inner and outer squares of each block. 
(Click the link to Rust Belt for better photos than mine. Bright sun shining in the windows from behind the piece made my photos under par.) 


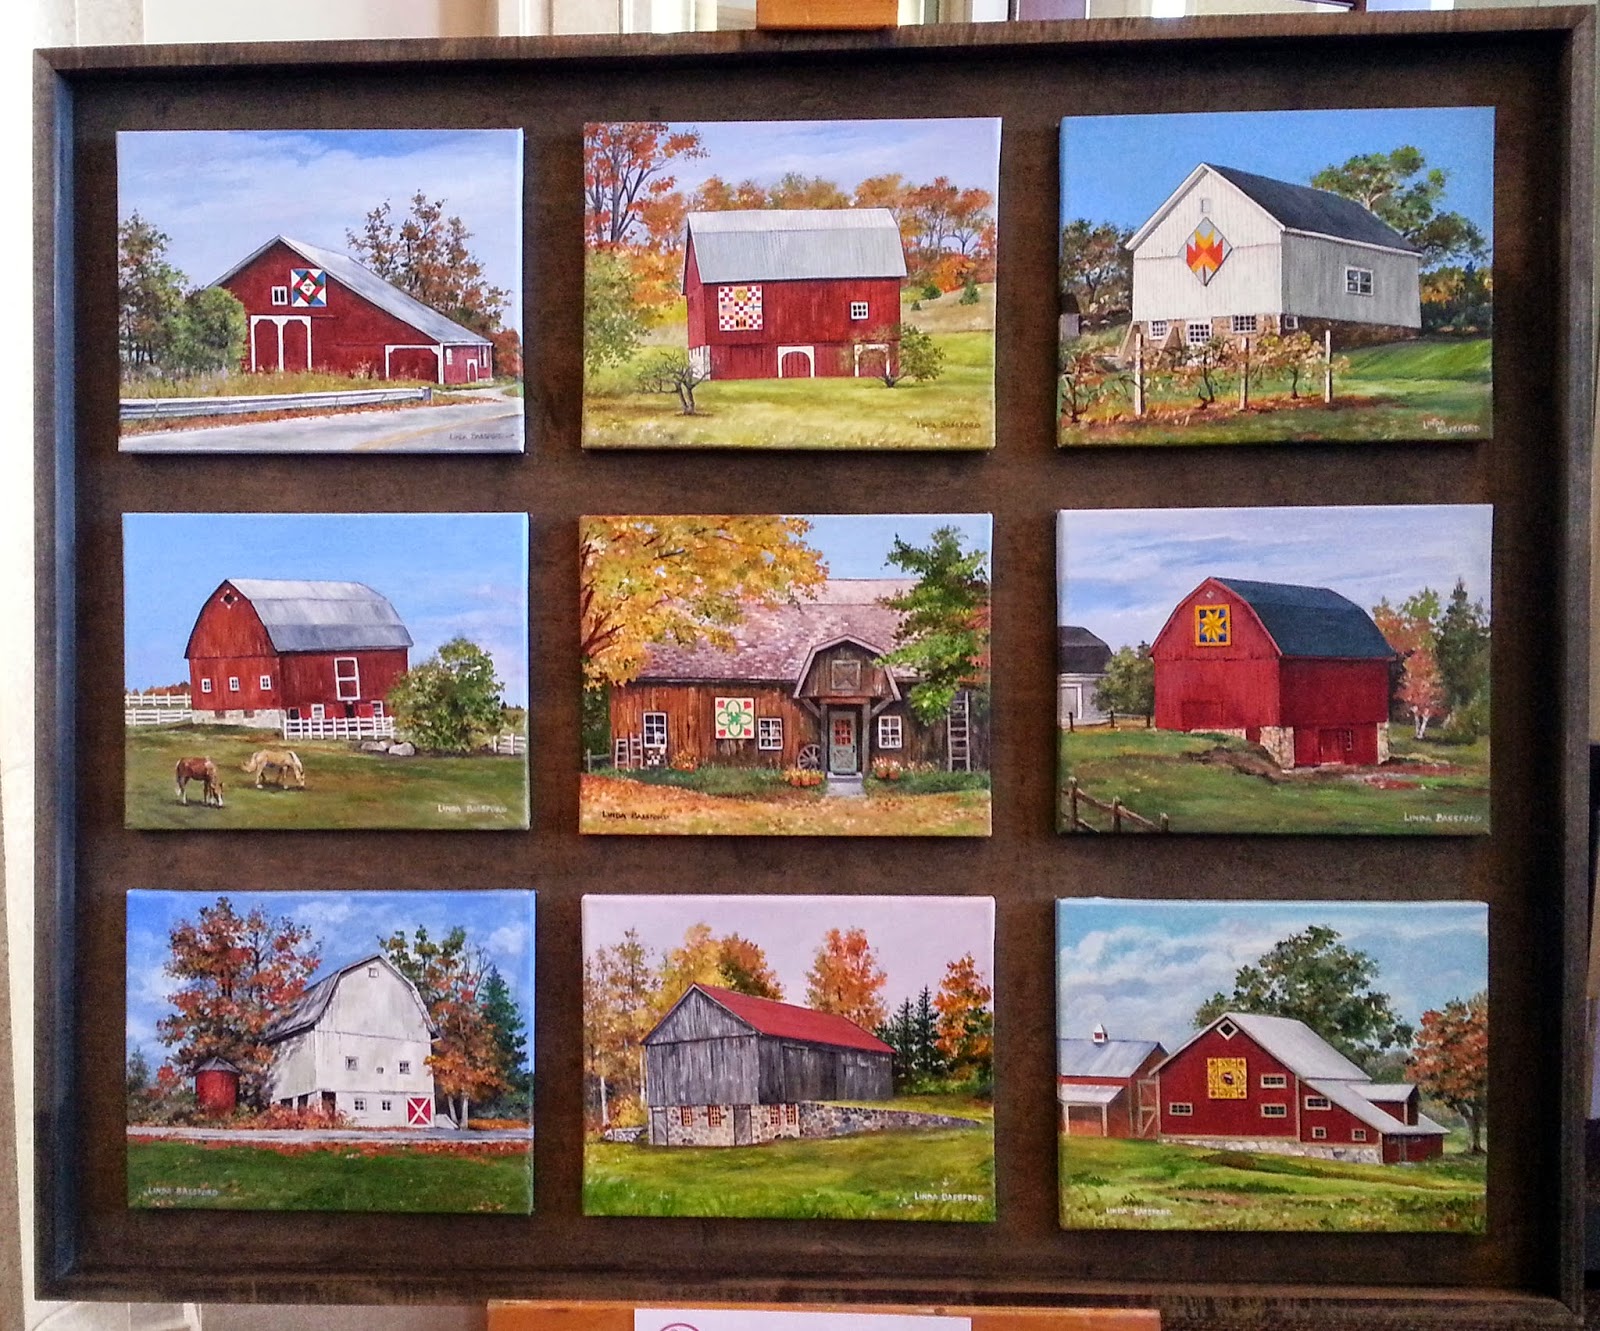
At the same venue (a bank) was MISSION PENINSULA BARNS. These paintings by Linda Bassford depict 9 of 10 barns on the Quilt Block Trail through Old Mission Peninsula (located in the northwest corner of Michigan's Lower Peninsula). She arranged the paintings, framed in a shadow box, using a 3 x 3 block layout, like a quilt. You can find out more about the Barn Trail HERE.


INDIGO GEMS of ARGUS was also at this venue. This quilt was made with cottons and feathers. It appeared that some type of yarn was used in the seams of each of the blocks. Robin Greve tells about her quilt in the artist's statement:
"This is an art quilt that is made with a 3-dimensional appearance and the Golden Mean Ratio ( 1+1=2, 1+2=3, 2+3=5, 3+5=8, etc.) in the different proportions. It is then assembled in a nontraditional method after each square/ rectangle is first quilted."


I was drawn to the piece, FEEL BEAUTY. The texture was so inviting, although I did not touch it. I will quote the description from the Art Prize website as it explains the piece much better than I could: 
“Feel Beauty” Fiber Mural exhibit engages the senses. The viewer interacts with the work and is encouraged to touch and feel their way through the mural. “Feel Beauty” was completed using all monochromatic white fibers connected in various sized embroidery hoops. Technical fiber manipulations were employed to create different sensual topographies, from hard to soft, round to ridged and deep to shallow. This mural raises awareness of blindness and learning through senses other than sight. We are exploring the tension between what we see and feel. This project begs us to question art for the other senses, and what the role of aesthetics is in this process. Is there a non-visual aesthetic? What does beauty feel like? This is a collaborative piece, designed by Hark + Hark, and executed with the assistance of UC professor Brooke Brandewie and 29 local fiber artists from Cincinnati, OH.


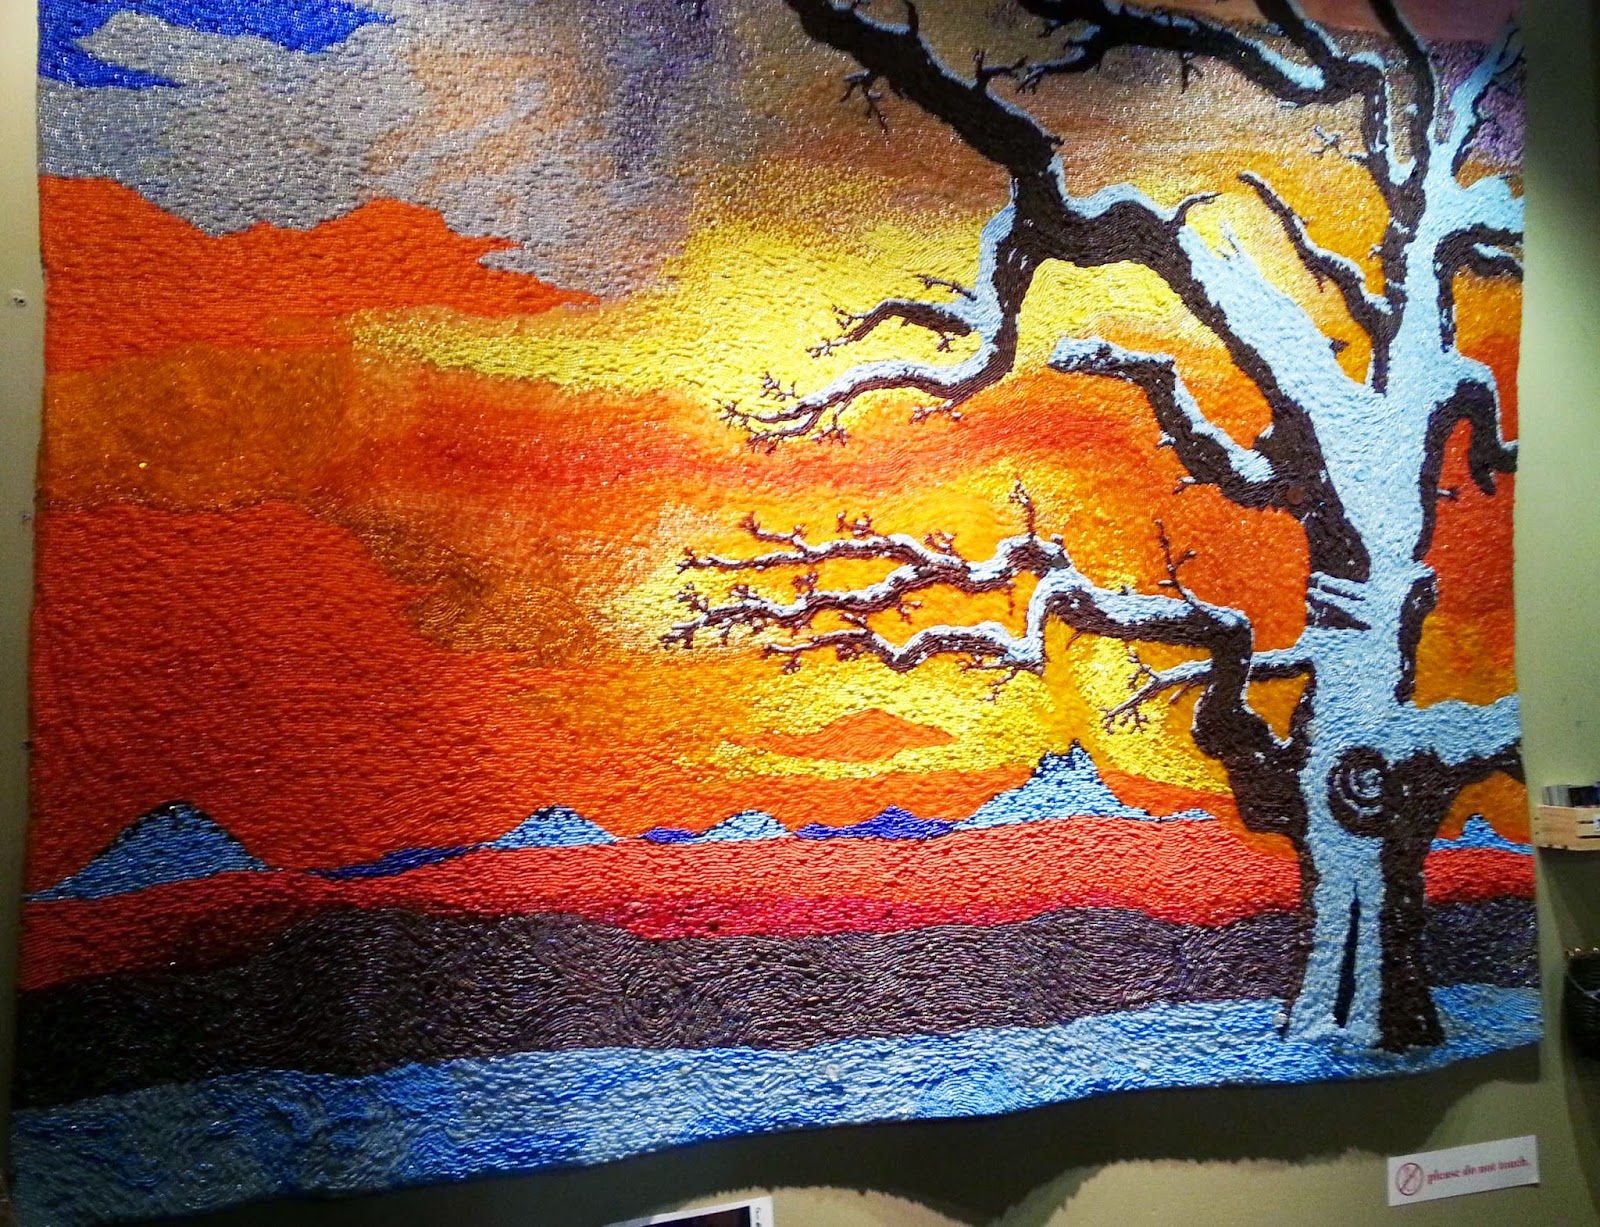
While this next piece is not a quilt, I was fascinated by the work involved by this young artist, Megan Harrigan, from Traverse City, Michigan. THE BEADED TREE was spectacular. Megan was standing by her piece and I was able to talk to her. She said she spent 10 months, about 5 or 6 hours a day (with it on her lap most of the time) sewing beads to the heavy canvas on which she had previously painted her tree. She wanted the sun to shine through and the colors to add life to the tree. 


I hope you have enjoyed seeing some of what we saw on our walking trip around Art Prize. And now I will leave you with the beautiful painting nature had for me on my drive home. (I did pull off on the side of the rural road to take this photo.) 


9/26/2014

Quilting with Friends

I spent this day quilting with friends. There were 3 of us and we had a very relaxing, enjoyable time sewing, sharing ideas, discussing recent quilt shop excursions. We said we need to do this more often and are planning a sewing day in October. 

These are the projects I was able to finish today. 

For the church craft bazaar I made 2 table runners with a Christmas border print
I am amazed at what creative minds and the equilateral triangle ruler can make!


For Christmas gifts, Michigan potholders with the embroidery machine.


 And a pillowcase for (I can't say, because it is) a Christmas present 
for someone who likes Star Trek.


Have you been busy with holiday gift sewing? or sewing for a fundraiser?


9/24/2014

Giveaway Winner and Chevron Quilt Finished

The winner of the eye spy charm pack from my Curious Cat blog post 


was selected today using the Random Generator. 
Comment # 13 was selected: 

Congratulations to Lee who I have emailed and will send the pack to as soon as I get her address.  


The Chevron Quilt
I have been working on this chevron quilt for over a year. It was requested by my younger daughter for her newest apartment after she graduated from college and started her career. 

She designed it. We shopped for the fabrics so she could pick out the colors she wanted. I used EQ7 to design it for her approval. She wanted a king size quilt for her queen size bed (looking down the road if she gets a larger bed).


She helped with the sewing. I cut the squares at home. When she came to visit on the weekends, she would sew the straight seams 1/4" on each side of the diagonal center line. Then I would cut and she would press so we had half square triangle blocks that measured 9". 

We arranged them into the color rows and she sewed them together and I pressed. We make a pretty good team. (She is just getting started in this quilting journey.) 

Once all the rows were sewn together, she and I looked at various quilting designs. We used a printout of the EQ7 image on 8.5" x 11" paper to sketch some idea. 

She chose to have pebbles quilted in the white chevrons in the main part of the quilt, triangles in the borders and elongated peaks in the colored chevrons. Those are shown in the photos below. 


We had Michelle Fialek, a friend and fellow quilt guild member quilt it. I did the binding with the grey fabric.

My daughter was so delighted with the finished quilt. Here is the photo I took before delivering it to her. 


And the quilt I loaned her is now back on our bed!

Have you ever planned and made a quilt, or shared your quilting skills, with someone close to you?


9/23/2014

Ghostly Quilting for Val's Tuesday Archives Link

Today is Tuesday and we are linking our Ghastly Quilting Themed blogs with Val's Quilting Studio. I did not think "Ghastly" was quite what my Halloween-themed quilts were, so I will use the title Ghostly

I thought it would be better to place photos of my quilts in one blog and reduce your linking time so you can visit all of the quilters who have linked with Val. I enjoy participating in the Tuesday Archives. I like sharing my ideas with others (hope you all like it, too) and getting inspiration from others. 

So, here are some of the Halloween quilts, large, small, long and tiny that I have created in the past  8 years or so. Let me know which one(s) are your favorite(s). 

Long Kaleidoscopic Table Runner: 
I had this cut of fabric

And turned it into this long table runner. Close up of one of the blocks. I will be quilting it with a spider web design. 


Wishing Owl
This is Halloween-related, I think. I taught this as a class for children at the local Art Council this summer. His little pocket in front could hold candy treats. The idea came from Quilting Arts Magazine.

The Halloween Wavy Banner 
was made to hang on the front door. I used it as one of the inspirational ideas on the pattern I designed and uploaded on  PatternSpot.com.

Haunted House 
This is a wall hanging I made for my younger daughter during her first year of college to decorate her dorm room during the Halloween season. (And this is the only photo I have, sorry it is not the largest file size for clarity.)


Table Topper
I finished this quilt last year for the table. I used some leftover Halloween themed fabrics in more of a random placement.


Thank you for taking a look. I do hope you get inspired for the season. I am off to see what others have posted. 

Happy Quilting!


9/20/2014

August Travels Net Bargains and More

In a previous post I talked about the Row by Row patterns I picked up on travels in Michigan's Upper Peninsula as my husband and I made our way to Escanaba. 

In Escanaba we stayed with my husband's cousin and his wife. It is always fun to visit them. The guys go golfing or fishing (they went fishing this time) and Debbie and I go shopping! There are many antique stores and boutiques in the area. This year we discovered some new shops.

We had lunch at Stone's Deli. I had a Chicken Cranberry Walnut Salad that was very good. We headed down Ludington St. to the shops. We went to what I can only call a junk store. It was interesting looking at things I remember growing up with. I saw 3 California Raisin toys priced $1 each. I remember how popular these were when my daughters were youngsters. I didn't need any but it was fun reminiscing as the song played in my head. Does anyone remember the raisins dancing on TV to "Heard It Through the Grape Vine"?


I did find an old electric insulator cap. I have always wanted an old insulator cap and this one was only $2 and in great shape (only needed some leaves cleaned out of it). I also bought a camel-colored wool jacket, in great shape, for only $2! I will take it apart and felt it for projects.

We continued on to an antique jewelry store called Once and Again where I found brooches and pins of all styles, sizes and colors. I purchased these pins. 


The hedgehogs are so cute and I think they will be the next "new trend", so I am readying myself!

On one street corner we found what was left of this tree being used as a flower display. I thought it was such a great idea I had Debbie snap a photo. 


Our last stop was St. Vincent DePaul. There were many things to examine there. The sets of dishes were very nice, but I didn't need any. I did, however, find the book section. And for 25 cents each, I bought these quilting and craft books. 


Debbie bought drivers from a container of golf clubs and a 12-foot curtain valance. The clubs will be the rods to hang the valances (after she cuts them to size) on the windows in her husband's garage work area. She is so clever! 

Thanks for visiting. If you have ever found a bargain or treasure on a trip, let us know what it was in the comments below. Would enjoy hearing from you. 

My next post will be about the pincushion exchange and the Swoon block exchange I participated in as well as a photo of my daughter's quilt that we worked on together. Until then......happy sewing. 


9/10/2014

My Twisted Traditional Block and Giveaway

Today I am a guest for the 52 Weeks of Twisted Traditional Blocks Quilt Along hosted by Kim at Persimon Dreams. I follow Kim's blog and in April I e-mailed telling her I would like to make a "new" block from a traditional quilt block. I am happy Kim let me take a guest spot. Visit Persimon Dreams and read Kim's interview with me as well as viewing the other twisted blocks that have been posted since January. HERE is the Flickr link to all the blocks.

I hope all of you enjoy the CURIOUS CATS block. I had fun designing it. I was on the lookout for mouse fabric while on our trip to the Upper Peninsulaand found this one at The Quilted Moose Quilt Shop.


My inspiration came when I found a photo of a block on the internet. I sketched it, but did not write down the website or blog it came from. It made me think of cats watching something interesting. Maybe fish or mice or bugs! 

The traditional name of the block is Missouri Star according the The Quilter's Album of Patchwork Patterns by Jinny Beyer. The book has more than 4050 pieced blocks and it took me a bit of time to find one that matched. Below is the block as I first drew it in EQ7:


I changed it a bit as you can see in the block below. 


Once I drew Curious Cats in EQ7, it was easy to cut the pieces for this block. EQ7 showed me the the rotary cutting requirements for the pieces and I just had to follow the directions: 


For my Twisted Traditional Block, I used only 2 colors for the cats. But as you can see, more colors can be used. 

If you would like to make this block here are the sizes of the pieces:

From Background Fabric cut:
  •            4  A squares 3-1/2” x 3-1/2”
  •            1  B square 7-1/4” x 7-1/4” and cut diagonally twice yielding 4 B Triangles

From each Cat Color cut:
  •            3  C squares 3-7/8” x 3-7/8” and cut each diagonally once yielding 6 C Triangles of each color

From  5” Center Fabric cut:
  •           1  D square 4-3/4” x 4-3/4”


I placed all of the pieces on the table as they were going to be sewn so I did not sew calico cats of different colors! (I have no photo of this step.)

To sew the block, begin with the center. Sew 2 C triangles (longer sides) of grey to opposite sides of the center square. 


Sew the 2 C triangles (longer sides) of black to the other sides of the center square.


Trim off any dog ears from the triangles to reduce the amount of fabric when stitching all the units together. 

Sew one of each color of C Triangle (longer side) to the larger B Background triangle (shorter side). 
Two B background triangles will have C triangles of color 1 on the left side and the other 2 B background triangles will have C triangles of color 1 on the right side.


My 1/4" foot really helped keep the units the correct size when sewing!


Sew the units into rows. 


See how two of the Flying Geese units have gray on the right side and the other two have the gray on the left side? 


Then sew the rows together. 


And the block is done.


To get the faces on the cats, I used thin copy paper and traced the outline of the cat's head. I folded the shape in half, drew an eye and half a nose and mouth on one side of the fold. I cut those areas out with tiny scissors and had a template. 


For illustration, the photo above shows the template on the block after I had stitched the face. I placed this over each of the cat heads and used a chalk pencil to outline where I would stitch. I have not embroidered in a long time and think magnifying glasses would have helped to do a really great job. But, I got the facial features on each cat (and each one is different). I realized after I had done 2 cats that fusible interfacing would have helped keep the fabric in its proper shape. But overall, I know they are cats (as did my husband, thank goodness). Fabric paint pens could have been used and it would have been much easier. 

This pattern is available for free for 2 weeks at PATTERNSPOT.COM  after that the pattern will be available for $1.

If you make the block, please send me a photo and I will post it on my blog. It would be great to see how everyone interprets this block.

Now, for the GIVEAWAY. . . . . .  This has ENDED.

I have a pack of 5" novelty prints that would interest curious cats. Leave a comment telling me what color your cats would be. If for some reason you are not able to comment on the blog, send an email to patchworkbreeze(at)gmail.com type CATS in the subject line. On September 24, 2014, I will pick a winner using the random generator. If you are or become a follower of my blog, let me know and you will earn a second entry to win. 


9/01/2014

August Was a Busy Month

August was a busy month for me and my family. 

My husband and I celebrated our 31st wedding anniversary in the first week. It is amazing to think that we have been married so long and yet the time seems to have gone by quite quickly and enjoyably. 

He and I took a trip to the Upper Peninsula of Michigan for the 3rd week of the month. It was a laid-back trip. We spent one night on Drummond Island, where he and his dad built a little cabin in 1985. The next morning we headed for Escanaba, Michigan to visit with his cousin and his wife. We took a leisurely drive via the Row by Row Experience! It is so wonderful that he was willing to detour a bit to help me obtain the patterns.

We went to Gloria's Quilts in Sault Ste. Marie, Michigan (a.k.a. Soo, Michigan) so I could pick up the free pattern there. Gloria was so nice. And  her husband, Paul, is also.  She has a spacious, well lit shop and I had to purchase the kit for the Row by Row because of the Northern Lights fabric. Take a look at her website, she has photos. She said I could take a photo of the Row by Row to post on my blog. 


We went down the road to The Quilted Moose Quilt Shop. They were not participating in the Row by Row, but being so close I had to stop. I am glad I did. I found just the fabric I wanted for the block I am making for my guest spot on the 52 Weeks Twisted Traditional Blocks on September 10! You will have to come visit to see what the fabric was and how I used it in the block. 

Quilting friends from Sault Ste. Marie, Ontario, Canada (across the the St. Mary's River via the Sault Ste. Marie International Bridge, often known just at the International Bridge between these twin cities) told about the wonderful coffee they get in Michigan from Superior Coffee Roasting Company. I don't drink much coffee, but I knew our younger daughter would enjoy some. I chose Sailor Sunrise for her and brought it to her recently. She said it was very good. 

Our next stop was about 30 miles away in Paradise, Michigan, the Wild Blueberry Capitol of Michigan and the gateway to Tahquamenon Falls. We had our lunch packed so we stopped at the mouth of the Tahquamenon River to eat and enjoy a view of Lake Superior. We were off to Village Fabrics & Crafts. 


The shop has many woodsy and nature fabric selections as well as flannels and fun children's prints. There is pine paneling inside and so many quilts on display. They have a nice room for sewing and lots of embellishments for the artistic quilter. I could not pass up the Row by Row kit of a bear and moose in the blueberries. I also bought fabric for a blueberry muffin table runner and some Angelina sheets.


It was here that my husband found a fabric panel a few years ago when we stopped that he asked me to make into a cover for his pool table.Hhe really likes and appreciates it.  This is how it turned out. (Hard to get a full photo of a large cover like this.)


 Well, we were not finished yet. There was another quilt shop in Curtis, Michigan. The Lavender Cottage is a gem in the rough. And I mean rough because it is out in what I would say is the middle of God's country. After leaving the tar road, it is 5 miles down a gravel road. I am glad there are humorous signs along to way because the first time I went there I was sure I must have missed it. I wish I had taken photos of the signs. They say things like "4 Miles Ahead," "Only 1/2 mile to go," "You are almost there."


The shop may be small, but it is filled with fabrics. Beautiful batiks, loads of woodsy-themed prints, food prints galore, and many novelty prints. The staff is friendly. Many quilters from the local campgrounds come here. In fact, one of  my friends from the Lower Peninsula camps here and goes quite often for her sewing needs. I bought quite a few cuts of woodsy fabrics for the potholders I am making. Of course I got the Row by Row pattern: 


We headed off to Escanaba at this point. I was happy and content to crochet a dishcloth as my husband drove. 

I will show you what I found in Escanaba in the next post. Thank you for stopping. If you are ever in the Upper Peninsula of Michigan, stop at these quilt stores for a dose of inspiration and maybe a yard or two of fabric. 

Comments are welcome. If you cannot comment via Blogger, email me at 
patchworkbreeze (at) gmail (dot) com and I will respond.