11/25/2020

Memories Made from T-Shirt Quilts

I have been working on a new website where I have some new posts. I'll be moving the posts from this site over there during next few the months. 

Read my latest post on using t-shirt quilts at the link below: 

https://patchworkbreeze.com/2020/11/25/new-memories-from-childhood-t-shirts/

You can read the first few posts by clicking the pink BLOG button in the header. 

Thank you for visiting the new Patchwork Breeze website. 

10/13/2020

Quilted Garden Party Row Along Show and Tell

From the many patterns designed for the row along "It's a Garden Party" a number of designers combined the patterns and made quilts. Today is the day they show us their creativity. 

Click the links below. I hope you are inspired by the projects posted. 


9/23/2020

Placemats for Warm Meals on Cool Days

Fall is making its arrival in Michigan! 

The sun sets earlier each evening.
We've had a few nights of hard freezes this past week. 
Apples of all types can be found at the Farm Market. 
Pumpkins are for sale on roadside tables, priced to match the size.
Yes,
HELLO, FALL!

This week it's time for Carla's Hello Fall Blog Hop. Forty bloggers have joined, posting their sewn projects, made for this season of cooler temperatures and various holidays. And you are invited to see what they have made.

Fall is time for meals of soups for my husband and I. We use the crockpot to cook the soup overnight. It also keeps the soup hot for the following day. We don't mind having the same soup two nights in a row. Cheese sprinkled into our soup the first night and a biscuit the next night adds variety. We follow no recipes for our soups. We add what we have and some spice. Making soup for so many years has led us to what we like and ingredients that go well together.

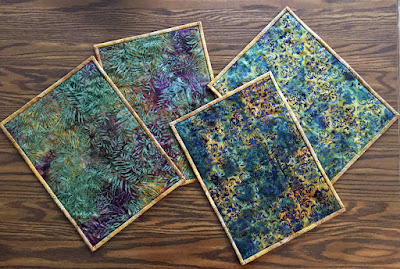
I made fall-themed placemats to protect the tabletop from the warm bowls.
Here is a photo of the backs of the placemats. I used two different fat quarters of Island Batik fabrics I had in my batik box.  
I had 2 yards of a lighter Island Batik fabric allowing me to use the same fabric for the placemat fronts. I embroidered a fall design in the bottom corner of each piece of fabric. 

The fall designs came from a free embroidery set I downloaded a few years ago from Artistic Threadworks.  (This design set is listed HERE.)
       
I used the batting as the stabilizer behind the embroidery design on the machine (reducing one step and one item to work with). I layered each designed front with one of the backing fabrics and stitched diagonal lines through all the layers. I marked the lines with a water-erasable fabric marker.
The final step was binding each placemat. I found a half yard of a Island Batik fabric in a lovely golden color with tiny green dots. It was definitely fall-like and matched both front and back of the placemats.

Thank you for stopping by. 
I invite you to comment and tell me if you used placemats during meals; and, if you do, have you made them? 

Here is the list of all the bloggers for this Blog Hop. 

Monday, September 21st


Tuesday, September 22nd
Wednesday, September 23rd
Thursday, September 24th

Follow the Pinterest Board for all the links.

9/19/2020

2 Days Until Hello Fall Blog Hop Starts


I'm looking forward to seeing what the season of Fall inspires others to sew or make. Carla of Creatin in the Sticks hosts great blog hops. I know the ideas these 40 quilters present this week will be awesome. I wonder how many of them I will decide to put on my "future projects" list.

Oh, Carla says there will be a giveaway or 2!

Below is the list of blogs to visit each day this week. I hope you enjoy them. I look forward to your visit here on September 23!

Monday, September 21st


Tuesday, September 22nd
Wednesday, September 23rd
Thursday, September 24th

Follow the Pinterest Board for all the links.


9/14/2020

Tutorial to Sew Dimensional Flowers and Leaves for Quilts

 Welcome, to those who are new, and those returning from last week's row along, The Garden Party Row Along, hosted by Seams To Be Sew. 

Today I am presenting my tutorial on how to sew the 3-D flowers and leaves for my row along quilt, Garden Welcome Wall. 

Before I begin, I want to thank all those who visited my blog. I am still trying to get around to replying to those who left a comment (I got some great ideas chruning in my brain for more flower blocks). Be sure to visit the designers this week. I am sure there are MORE wonderful blocks to gather for your upcoming projects. 

Tuesday, September 15, 2020

Daughters of Dorinda | Elizabeth Coughlin Designs
Just Let Me Quilt | Lovingly Lissa | The Quilt Rambler

Thursday, September 17, 2020

Fabric Bash/Carpe Blogum | For the Love of Geese
Kathleen McMusing | Ms P Designs USA | QuilterChic

~~~~~~~~~~~~~~~~~~~~~~~~~~~~~~~~

OK, let's get to the tutorial!

Making the 3-D flowers.

Choose 2 fat quarters of fabric for the flowers. One or both colors could become the front of the flower, so similar shades or hues work well. 

I chose these 2 colors for this tutorial:


Press the fabrics and lay them on top of each other, right sides together. 

Draw six 6-1/2" diameter circles, with a pencil, marker, or erasable pen. Each circle will make 4 flowers.


Cut out each double layer for 2 circles with fabric right sides together. Fold in half, cut into 2 sections. Fold those half sections in half and cut in half to give 4 quarter circles, with right sides together. 

Wind the yarn or pearl cotton to make 4 loops about 4 inches long. Tie a knot one inch from the looped end. Tuck the yarns inside the two 1/4 fabric pieces with RST as shown in middle photo below.

Sew the arc and the straight edges, enclosing the entire 1/4 circle. The end yarns will hang out of the point a bit. Clip the points off the corners, including the yarns hanging out. 
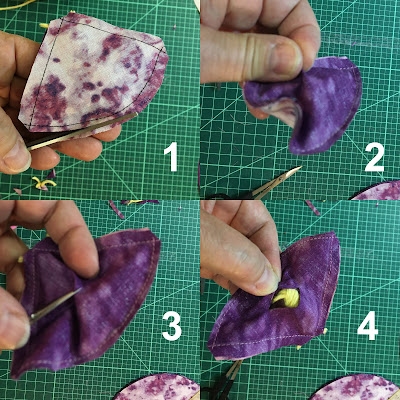
Trim the arc seamline to 1/8". Pull the front and back fabrics away from each other. Make a small clip in the back fabric, not cutting the yarns inside. Carefully place scissors point in the clip and cut a 1" opening in the back. 

I have a short video showing how to turn the flower right side out. I hope it offers you some variety in presentation. (This is my first video try with the Jumprope app.)

video of turning right sides out 

Making the 3-D leaves

Cut the strips from the 2 green leaf colors and the backing strips. 1) Align one of each color narrow strip on each other with right sides together. 2) Stitch the 2 strips together along one long edge with 1/4" seam allowance. 3) Press the seam allowance open.


Place the 2-colored seamed units RST on the one-color backing strip.
Use the template to trace the leaf shapes as shown. Leave 1/4" seam space between each leaf. Flip the direction of the fabric to have the 2 colors on different sides of the leaf front. It adds variety. 

Reduce the machine stitch length to 1.5 or 2. Sew on the lines drawn around the template. Trim each leaf from the strip, leaving 1/8" seamline.

Follow the next steps to turn the leaf right side out. 
1) Hold the seam with one hand and the backing fabric with the other hand. 
2) Pull the sections away from each other and snip a small hole in the backing fabric.
3) Cut an opening about 1" long in the backing. 
4) Turn the right sides out through the opening. 
5) Press.
6) Make and press more leaves. 

Combine the flowers with the leaves on each of the short stems. Then add some here and there as you like. I suggest they are tacked down with needle and thread AFTER the wall is quilted (making the quilting process easier).

I hope this tutorial helps you make 3-D flowers. Think of other shapes to use for flowers--hearts is one I have thought of trying!

A quote I found on the internet: 


9/12/2020

The Garden Party Row Along Week 2


Tuesday, September 15, begins the next week of The Garden Party Row Along

I am looking forward to seeing the patterns this group of designers developed and get my free copies. I hope you are enjoying the Row Along. 

Here is the list of the designers' posts. 

Tuesday, September 15, 2020

Daughters of Dorinda | Elizabeth Coughlin Designs
Just Let Me Quilt | Lovingly Lissa | The Quilt Rambler

Thursday, September 17, 2020

 For the Love of Geese
Kathleen McMusing | Ms P Designs USA | QuilterChic


9/09/2020

My Garden Quilt Block

 HELLO and WELCOME!

Today I am happy to reveal my block for 

It's A Garden Party Row Along

Marian from Seams To Be Sew is hosting this Row Along for the 6th year! She works for months planning and keeping us all on top of things. It's quite a popular event and every year more designers join. I'm in my 6th year to "row along" with her.

I want to thank Northcott fabrics for being a long-time sponsor and helping each of the designers by providing us with up to 1 yard of fabric to use in our blocks. 

My choice this year was fat quarters of these 4 beautiful fabrics:


I want to tell you about the special happenings during this row along. 

Of course, there is the free quilt pattern each designer is offering during their featured week.

Each designer will tell you about giveaways and/or discount codes that happen during their week of posting. 

For everyone 

Electric Quilt Company 

has a 20% off discount code

The code is GARDENPARTY20 

Use the code to purchase products from the EQ website. 
It is good for the entire time of the row along event!

EQ Cotton Lawn Inkjet Fabric Sheets are my go-to sheets for any project where I am using photos. I've tried so many other brands of inkject fabric sheets, but EQ's are the best! They are easy to use and the feel of the sheets is so much like the quilting cottons I use.

This week only, and special to my blog, 

(starts September 10, 2020/ Ends September 17, 2020) 

is the chance to win a fat quarter bundle giveaway from 

Wouldn't a bundle of fat quarters be a great addition to your stash? 


This is a $20 value. The winner must pay shipping costs. 
You can find out more about this bundle HERE.

Enter through Rafflecopter below and 
please read all the rules for the giveaway at the bottom of my page.

And now, DRUM ROLL. . . . 
Presenting to you, my Garden Welcome Wall block. 


To get my pattern for free during the Row Along

On Monday, September 14, 2020, 
I will give you some tips about how I worked with the pattern's 3-D flowers and adding flowers with a broderie perse method as another option.

I know you are excited to visit the other designers featured today. 
They are listed below. 
Please leave me a comment about your favorite flower or flower color. 
It will give me an idea for my next flowers block. 

And please read the guidelines for the Rafflecopter giveaways 
at the bottom of the post. 
Thank you. 

Guidelines for Giveaways:

Giveaways offered by sponsors are assigned to the various bloggers/designers for their featured day.

There are no prior announcements on who is doing which sponsor except to the sponsor and blogger/designers themselves.

You’ll have to visit the blog or the featured blog to enter the giveaways.

Some giveaways can also be entered at Seams To Be Sew. You must have commented at the blog of the designer/blogger’s post to enter at Seams To Be Sew, Winners who win from entering at Seams To Be Sew will be checked for the comment. This does not mean that commenting at Seams To Be Sew will get you an entry, it doesn’t.

When you enter a give away that asks you to answer the question asked on the entry form, you do need to fill in that box. No answer means your winning entry will be ignored and canceled.

You are only allowed to enter once at each of the featured day sites. Giveaways are different at each site, thus you can enter those giveaways.

I will start announcing winners on September 15, 2020, and finish announcing winners on October 15, 2020.

You must give a valid email address when you enter the giveaways, any email returned to me, loses the ability to win automatically.

You are given 3 days to answer the email, if you do not answer within 3 days a new winner will be drawn. Check those spam/junk mail folders, you may miss that winning email if you don’t do so because there are no exceptions to this rule.

If you are notified that you are a winner, in all cases except for digital downloads and gift cards/certificates, you will need to provide your name, address, city, state, zip code, country, telephone number, and email address.

No purchase whatsoever is necessary.

You must be 18+ in order to win a gift.

You are responsible for claiming and paying any tax owed on the value of any gift that you win. Prizes valued at $500.00 should be claimed.

All winners are chosen at random.

All winners will be announced on the blogs via the Rafflecopter entry form and/or post by the blogger at the site where they won and here at Seams To Be Sew. All winners must allow for their first name and first initial of their last name to be announced on this blog.

Odds of Winning a prize are based on a total number of rafflecopter entries during each week and in total for all giveaways.

This giveaway is void where prohibited by law.

Participating bloggers/designers may enter any of the giveaways.

The word giveaways in the rules and guidelines are also known as sweepstakes.