Welcome, to those who are new, and those returning from last week's row along, The Garden Party Row Along, hosted by Seams To Be Sew.
Today I am presenting my tutorial on how to sew the 3-D flowers and leaves for my row along quilt, Garden Welcome Wall.
Before I begin, I want to thank all those who visited my blog. I am still trying to get around to replying to those who left a comment (I got some great ideas chruning in my brain for more flower blocks). Be sure to visit the designers this week. I am sure there are MORE wonderful blocks to gather for your upcoming projects.Tuesday, September 15, 2020
Daughters of Dorinda | Elizabeth Coughlin Designs
Just Let Me Quilt | Lovingly Lissa | The Quilt Rambler
Thursday, September 17, 2020
Fabric Bash/Carpe Blogum | For the Love of Geese
Kathleen McMusing | Ms P Designs USA | QuilterChic
~~~~~~~~~~~~~~~~~~~~~~~~~~~~~~~~
OK, let's get to the tutorial!
Making the 3-D flowers.
Choose 2 fat quarters of fabric for the flowers. One or both colors could become the front of the flower, so similar shades or hues work well.
I chose these 2 colors for this tutorial:
Press the fabrics and lay them on top of each other, right sides together.
Draw six 6-1/2" diameter circles, with a pencil, marker, or erasable pen. Each circle will make 4 flowers.
Cut out each double layer for 2 circles with fabric right sides together. Fold in half, cut into 2 sections. Fold those half sections in half and cut in half to give 4 quarter circles, with right sides together.
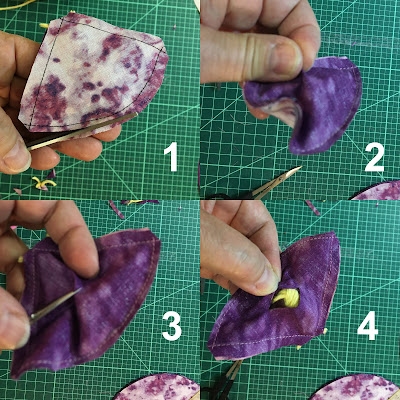
Trim the arc seamline to 1/8". Pull the front and back fabrics away from each other. Make a small clip in the back fabric, not cutting the yarns inside. Carefully place scissors point in the clip and cut a 1" opening in the back.
I have a short video showing how to turn the flower right side out. I hope it offers you some variety in presentation. (This is my first video try with the Jumprope app.)
I hope this tutorial helps you make 3-D flowers. Think of other shapes to use for flowers--hearts is one I have thought of trying!


1 comment:
Thanks for sharing a tutorial for you sweet block.
Post a Comment