Showing posts with label #patchworkbreeze. Show all posts

1/31/2019

Texture in Quilts

February Reveal for The Endeavourers.  

"We are a group of [12 international] quilters who take part in a quarterly challenge to make a smallish art quilt of any (reasonable) size according to a theme chosen at the beginning of the quarter.

We work in any style suggested by the theme, but once in a while, we will also throw a particular technique into the mix as an incentive to be adventurous."


You can read more about the group HERE. You can also see all the quilts from the members of the group HERE.

The theme for this quarter reveal is TEXTURE. 

This is what I found to use when the theme was first announced. 

As I progressed with this art quilt, I found other fabrics and materials to use. I changed the composition, too. 

My final piece, Treasuring Grandma's Memory, is completed (although I want to add a necklace hanging out of the jewelry box and add some type of leaves to the flowers). This is a photo of my mother-in-law. My husband is delighted with this tribute to her. 

Here are a few close-ups to let you see the types of texture I brought in to this art quilt. 
I tried to give the vase a smooth texture with the satin-like fabric. The idea of etching was done with stitches after I placed batting behind the satin. I trimmed the piece and appliqued it to the background fabric.

I made the jewelry box from a technique I watched Heather Thomas demonstrate on a preview video for National Quilter's Circle HERE. (No affliliation) Below are photos of how I did this.

Damp cloth poked through grate of cooling rack from kitchen to air dry, 

iron and attach stabilizer, 

ready to cut.

I found some synthetic suede-type fabric that had a backing on it. It looked great for a photo frame. 

I printed the photo on an EQ Cotton Lawn Inkjet printer sheet and I stabilized it with iron-on stabilizer. I cut an opening in the suede where the photo would show through from behind it. 

After appliqueing it to the background, I noticed that the stabilizer showed through on the edge just a bit. 
I used a brown Fabric marker to color the white. All fixed:

And finally, I used the batik background fabric to create a stucco appearance on the wall. The thought the colors created a patina and roughness of an old wall. 


Be sure to visit the other members of The Endeavourers group and see their use of texture in their art pieces. 


7/31/2018

The Endeavourers Art Quilt Reveal

Today is the The Endeavourers' Art Quilt Reveal 
for the 3rd quarter 
of our first year as a group. 
The theme for this challenge was Spirals. 
Visit our blog to see all the designers' projects.

I find the internet so helpful in getting my mind started on a project. In my teenage and college years, I would have been visiting libraries and checking out books or magazines to research a topic. As the Yellow Pages phone book advertised: Let your fingers do the walking...." Well today, my fingers walk the internet!

As some of you know, I interpret topics in the literal sense. Spirals are mathematical. I took a strolled down memory lane.
(https://www.youtube.com/watch?v=4RZdu663Dag)
In high school, geometry meant learning theorems and formulas, writing proofs, and taking nerve-wracking tests! I didn't see where any of this knowledge would help me out in the world. (I was a teen in the 70s, before Title IX we gals were limited to 3 or 4 career choices which didn't include engineers, drafting, and such.)

I wish teachers had related geometry to quilting, I would have done SO WELL! Application would have been very beneficial. (I wonder how many quilters now see geometry as fun!?)

HERE is the website I found that helped me learn how to draw spirals beginning with a certain number of points. A straight line is 2 points, a triangle is 3 points, a square is 4 points, and so on.
I chose to begin with a 3/4" square. I knew I had a button that size to put in the middle of my art quilt.


Later I found THIS video showing how to draw a 2 point spiral. I was very interested in the virtual compass, pencil, and protractor/ruler that he used in the video!

Shown HERE, spirals can be drawn using the Golden Ratio! I have a curved design ruler for making clothing patterns that could be used to make this spiral.

But I digress.

I divided the spiral into 4ths, using the 4 sides of the square to delineate the areas of the color. I chose to use batiks in shades of 4 colors. I cut the sections of the drawing apart to use as templates for the batiks.
I wanted to define the drawn line of the spiral and knew a cord or ribbon would be easily manipulated. I had a silver cording with little loops off each side. I sewed a gold cording onto the silver cording to give more bling! Then I applied the cordings by machine to the raw edges which was the spiral line.
With the leftover cording, I sewed the small tight spiral separately from the background, then appliqued it onto the background. As you can see in the photo above, the background was a bit short on this particular side. I had to add some fabric as you will see later.  
I hand sewed what seemed like a gazillion beads for two reasons. First, the raw edges were not totally caught in the stitching of the cording. (You can see how the middle pink has some fabric covering the silver loops near the seam.) Second, I had to give more sparkle to my spiral line! You see in the middle, the square hole, which is where my initial 3/4" square in my drawing was located.
 And now. . . 
my completed art quilt titled:

SPIRAL BLING! 


Here is a list with links to all the members' own blogs:
Catherine

10/25/2017

Pattern Winner Announced

Alas, the blog hop Enter If You Dare has ended. It was so fun visiting the bloggers' posts to see what they had made for Halloween. Each of the projects was amazing. I got so many ideas! I hope you were able to choose a few ideas to make for future Halloweens. 

Thank you all who visited my blog and my Facebook page, too.

Thank you to Marian of Seams To Be Sew for organizing this blog hop. I am looking forward to joining her next hop project! Many thanks, also, go to the sponsors, Fat Quarter Shop and Timeless Treasures for their wonderful giveaways! You can check Seams To Be Sew to see the winners. 

I had a giveaway of my own. Rafflecopter randomly chose a winner today. Edith G. entered and left a comment to my request: "tell me what color scraps you would sew together and what you would fuse onto that "new" fabric." 

I will email Edith the three patterns (pictured below) I have designed. All are available at Patternspot.com along with other patterns I have written. 

 Woven Fabric Christmas Stocking

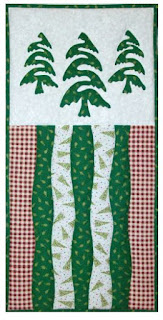
 Wavy Panel Pattern

 1-2-3 Sew Easy Throw Quilt


The comments to my question were marvelous ideas. I encourage each of you to try the ideas you wrote. I think you will all have wonderful quilted items. And as one person mentioned: "It is a free quilt" because you are using scraps you might have tossed!

Happy Halloween!