Today is the reveal for The Endeavourers 3rd quarter art quilt theme, A Walk in the Park. Each of the members of this international group have posted their work HERE.
My art quilt is titled "The City Park" and you can read about my process HERE.
Thank you for visiting my blog.
Showing posts with label art quilt. Show all posts
7/31/2019
7/31/2018
The Endeavourers Art Quilt Reveal
Today is the The Endeavourers' Art Quilt Reveal
for the 3rd quarter
for the 3rd quarter
of our first year as a group.
I find the internet so helpful in getting my mind started on a project. In my teenage and college years, I would have been visiting libraries and checking out books or magazines to research a topic. As the Yellow Pages phone book advertised: Let your fingers do the walking...." Well today, my fingers walk the internet!
As some of you know, I interpret topics in the literal sense. Spirals are mathematical. I took a strolled down memory lane.
| (https://www.youtube.com/watch?v=4RZdu663Dag) |
I wish teachers had related geometry to quilting, I would have done SO WELL! Application would have been very beneficial. (I wonder how many quilters now see geometry as fun!?)
HERE is the website I found that helped me learn how to draw spirals beginning with a certain number of points. A straight line is 2 points, a triangle is 3 points, a square is 4 points, and so on.
I chose to begin with a 3/4" square. I knew I had a button that size to put in the middle of my art quilt.
Later I found THIS video showing how to draw a 2 point spiral. I was very interested in the virtual compass, pencil, and protractor/ruler that he used in the video!
Shown HERE, spirals can be drawn using the Golden Ratio! I have a curved design ruler for making clothing patterns that could be used to make this spiral.
I divided the spiral into 4ths, using the 4 sides of the square to delineate the areas of the color. I chose to use batiks in shades of 4 colors. I cut the sections of the drawing apart to use as templates for the batiks.
I wanted to define the drawn line of the spiral and knew a cord or ribbon would be easily manipulated. I had a silver cording with little loops off each side. I sewed a gold cording onto the silver cording to give more bling! Then I applied the cordings by machine to the raw edges which was the spiral line.
With the leftover cording, I sewed the small tight spiral separately from the background, then appliqued it onto the background. As you can see in the photo above, the background was a bit short on this particular side. I had to add some fabric as you will see later.
And now. . .
my completed art quilt titled:
SPIRAL BLING!
Here is a list with links to all the members' own blogs:
Catherine
1/15/2018
Nature Project Peek
I am a member of a new online art quilt group called The Endeavourers. (You can visit our blog HERE.) 'The group was started by two of the members of our now disbanded Four-in-Art quilters. Having an online art quilt group helps challenge me to try 4 different ideas during the year.
The challenge reveal theme for February 1 is NATURE. Below is just a peek of what I worked on this week. I searched my photo files, edited the photos, and printed them on EQ Premium Cotton Lawn fabric sheets. It is my favorite fabric sheet for photo printing.
Please come back on February 1 to see the quilt project I make with these--and visit all the other members' posts to see how they interpret the challenge theme.
The challenge reveal theme for February 1 is NATURE. Below is just a peek of what I worked on this week. I searched my photo files, edited the photos, and printed them on EQ Premium Cotton Lawn fabric sheets. It is my favorite fabric sheet for photo printing.
Please come back on February 1 to see the quilt project I make with these--and visit all the other members' posts to see how they interpret the challenge theme.
2/02/2016
Four-in-Art 2016 February Project
The first 2016 "project reveal" for the Four-in-Art Group was yesterday.
I hope you got to see all of the members' projects.
What did you think of them? How did you like their use of color?
Today I am going to tell you about how I designed my quilted sunflower wall hanging, which I titled, "A Closer Look into the Stem."
We were charged with using a sub-category of MICROSCOPIC in this color-themed project.
I hope you got to see all of the members' projects.
What did you think of them? How did you like their use of color?
Today I am going to tell you about how I designed my quilted sunflower wall hanging, which I titled, "A Closer Look into the Stem."
We were charged with using a sub-category of MICROSCOPIC in this color-themed project.
We were to find something we were interested in and look at it on a microscopic level. (It didn't mean our quilt needed to be microscopic). Some examples of topics to Google with the word "microscopic" were: sea water, viruses, mountains, chocolate, sugar, and ice. When exploring many of these elements on a microscopic level there could be repeating geometric shapes or interesting organic shapes that can be applied to quilting inspiration.
This was a tough project for me.
I understand "some" uses of the color wheel and the choices one can make;
So, I put that on hold and worked my way through the microscopic aspect of this project.
I looked at butterfly wings, chemicals, minerals, gems, plant cells, bird feathers and bug parts!
The choices were over-whelming. My Pinterest Board is bulging.
(The United Kingdom has the Micropolitan Museum
with curated exhibition halls. Really!)
I found macrophotographic is the term used for microscopic photos.
Some of those were cross-sections of flower stems.
There was a really cool one of an orchid and some of sunflowers, too.
![]() |
| Image courtesy of foto76 at FreeDigitalPhotos.net |
I like sunflowers. The cross-sections could be drawn.
(I am glad we have 3 months to work on a project,
because I was down to the final 3 weeks.)
I would use the cross-section of a stem as the center of the flower.
I printed it onto fabric in the computer printer.
I used black thread to stitch around all the parts of the stem cross-section.
I found a sunflower coloring page that was free to use but not redistribute.
I enlarged it to fit the petals around the 8" center I had printed on fabric.
I used a glue stick to keep all the petals in place while I sewed the center (above).
I worked with yellows to yellow-orange colors and chose a green background.
I know this was not exactly the analogous color scheme I had looked at on the color wheel, but I liked the range of yellows with the green background.
I had a number of thread colors to work with and found that the rayon threads gave more pizzaz to the petals than the cotton threads.
The petals were pretty flat (below) and needed more color so I added other fabrics to the petals. I wanted the microscopic stem to show as such, so I didn't put any color there.


The petals were quilted to the batting (see the mess on the back).
When quilting all three layers,
I wanted the quilting to be simple and not distract from the flower.
I was pleased with the box overlapped by the on-point box and set behind the flower.
I put triangle corners on the back for hanging the quilt.
I do this before sewing the binding on.
I am able to place a dowel in the triangle pockets and hang the quilt
on one nail put into the wall.
What colors would you use to create a project?
Is there something microscopic that interests you?
Leave a message and let me know.
I think I might try something with a butterfly wing just for fun.
I do this before sewing the binding on.
I am able to place a dowel in the triangle pockets and hang the quilt
on one nail put into the wall.
What colors would you use to create a project?
Is there something microscopic that interests you?
Leave a message and let me know.
I think I might try something with a butterfly wing just for fun.
1/12/2016
Art Quilts
I am joining in the Tuesday Archives Linky at Val's Quilting Studio. Today's theme is Art Quilts. I have made one page with my past posts. Thank you Val for a venue to share with others what I have made. Perhaps you will glean some inspiration from some of my works. Email me if you have any questions. Thanks for visiting.
FABRIC LANDSCAPE PANELS COMPLETED (Full post HERE)
Miriam and I finished stapling the fabric panels to the wooden frames. Here is what the finished piece looks like.
I kept a bit of the floor lamp and rug in the photo to give you an idea of the size. Each panel is 51" high and the center one is 40" wide. The other two are 35" wide. We will have 2" between each panel when it is hung.
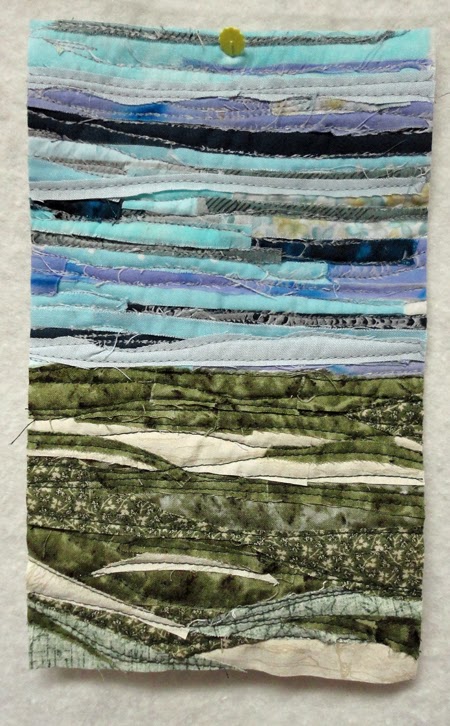
MINI LANDSCAPE FROM AQS CLASS (Full post HERE)
I have to post a photo of the 5" x 7" mini landscape I made in Lenore Crawford'sclass on the last day. She calls her technique Mini Blended Fabric Collages. It is a mosic technique. The fabric is cut and repositioned just over the piece next to it. Everyone in the class had a blast...and we all went away with a project we were proud of. Now to mount it.
SCRAPS PUT TO USE (Full post HERE)
I can't throw away most scraps. So from the projects I have been doing, I am usingAngie Padilla's suggestion of turning them into fabric collages. (She has lots of other ideas for scraps at her website.) So I lay them on a batting scrap near the cutting table to be sewn and then cut into inchies, made into a cosmetic case, etc. Presently, I am making a tiny landscape in the style (and I use that word loosely) ofAnn Loveless, from whom I took a class a few years ago.
LANDSCAPE WORKSHOP (Full post HERE)
Today I attended a workshop taught by Ann Loveless. The Tall Pine Quilters Guild had her come. She taught us how to make a lake collage wall hanging. By the time the 5 hours were up, we had the sky, water and sandy beach done. The next step was to add the trees and ground details. I took 2 hours more before the guild meeting to add the trees, leaves and begin the grasses. Here is my progress up to this point.
Ann spoke at our guild meeting that night. She had a PowerPoint presentation showing her studio and how she makes her art quilts. She described her three styles. I returned home very excited to finish my project.
9/11/2013
Mapping The Way-Four in Art Project
I feel very privileged to have been accepted into the Four in Art on-line group just this past month. I am taking this membership quite responsibly.
The theme for this year is Urban and the challenge for this quarter is Urban Maps.
I have done a great deal of thinking about this topic. How shall I quilt about maps in a 12” square space?
I could do a piece showing a city map with streets and work
colors in to show types of land use: buildings, neighborhoods, parks, or all of
it.
I could do a piece incorporating words found on city maps
using stenciling, paints, stitches and such.
Should I show how a city developed by creating a sheer
overlay of a present day map that can lift to reveal a dated map from a century
ago?
Should I focus on new technology such as GPS mapping, or
what about mass transportation maps?
Maybe I could do an abstract representation of a city map
using a cut and slash method of quilt making.
Make a color study of a statistical map indicating population,
poverty, etc.
There are so many choices. I must narrow it down to two or
three and get working on it, since November 1 will be on me in no time.
In my research, I discovered that from the 14th Century
on, mapmakers used a combination of methods to produce a pictorial city map.
They included painting, sketching and engraving. I see the making of an art quilt piece today is similar to what mapmakers have been doing for hundreds of years.
I have learned that a pictorial map was intended as a decorative
object and communities felt a sense of importance if one was made for them.
Maps were most commonly drawn from the perspective of the cartographer,
creating a perspective view rather than an aerial view, which did not allow a
person to see all there was in the city. Leonardo da Vinci improved on
mapmaking by drawing plans of a city layout and building outlines. These maps
moved away from pictorial oblique maps toward outline plans. In the 18th
Century, balloons tethered above London
helped cartographers see and record the layout of streets and roads although the wind posed some problems.
A few books I found helpful were:
Understanding Maps of
Our World: Maps and Cities, published by Gareth Stevens Publishing, 2010
The Penguin Historical
Atlas of North America , by Eric Homberger,
1995, Penguin Books
One Planet Many
People: Atlas of Our Changing Environment, published by United Nations
Environment Programme, 2005 NOTE: This
book is spectacular for the photography. It is an oversized book and very heavy
but fascinating.
As I was investigating the topic on the internet, I came
across the webpage for Valeria S. Goodwin, who
designs cartographic, architectural, and abstract quilts. She written a book Art Quilt Maps: Capture a Sense of Place with Fiber Collage-A Visual Guide that C & T Publishing has just released. It looks like a book I must view!
Subscribe to:
Posts (Atom)