Hello. Thank you for stopping.
Today is my scheduled day to post an EQ7 drawing tutorial for the Autumn Applique Animal Blog Hop. First, I want to thank Bea of beaquilter.com for inviting me to once again participate in one of her blog hops. They are always fun.
And a big thank you to Electric Quilt for sponsoring this blog hop. They have a Great Giveaway for one lucky blog hopper. You will find the details after the tutorial.
I will show you how I designed this cute green apple.
I must tell you that I save each step of my drawing in the Sketchbook as I go. It insures that if my computer has a hiccup I don't lose any work. PLUS, I can get back to something I liked (or didn't) and move the design in a different direction.
Open EQ7, click on Block>New Block> Easy Draw + Patch
Draw at the top of the worktable. Click the appliqué tab at the bottom of the screen.
I want to draw a heart using the Drawing Toolbar. My toolbar
shows a circle. If I click on the tiny triangle in the top corner of the Oval
Tool button, a pop out menu shows and I click on the Heart shape.
I draw a heart and will make it a bit wider and change
the shape a bit to look like an apple.
To make changes, I select the Pick tool button--the arrow at the top of the Drawing Toolbar.
I want to turn the heart just slightly to the left. This Angle of Rotation box allows me to enter a number. An arrow shows that the angle of rotation turns clockwise. Since I want the apple to rotate to the left, I use a larger number. Play around with this tool and see what happens.
To change the point of the heart shape, I select the Shape tool button (circled in red). Then click on the point of the heart. A square, black node appears. There are two blue lines coming out from this node.
I work with one side at a time. I click and hold onto one of the little, square, open boxes at the end of one blue line and move it down to the bottom of the worktable. I repeat for the other blue line. The shape of the heart changes and looks more like an apple.
I add a stem by selecting the Line Tool (green arrow) and connecting the ends of the lines. Since I drew the stem after the apple, the EQ automatically places the stem in front of the apple. I want to position it behind the apple, so I select the stem and then click on the send to back button (red arrow).
Leaves are next (looks a bit like hair to me). I use the Oval tool again; but it is a heart and I want leaf shapes. So I click the tiny black triangle again and select a leaf shape. I draw one.
To make the other leaf, I click Edit on the top taskbar and select Copy. Then I select Edit again and click on Paste. (You could, instead, use CTRL + C to copy, then CTRL + V for paste.)
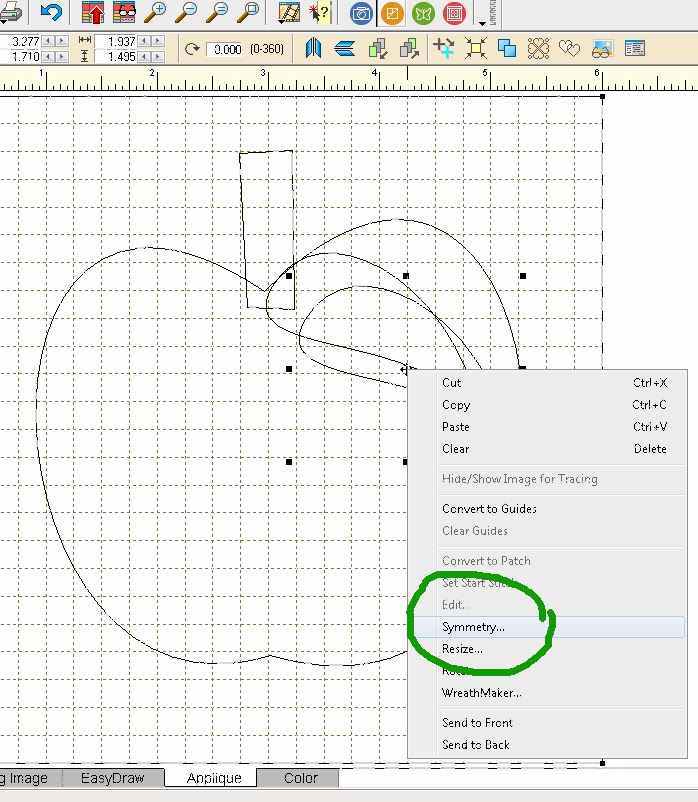
I have a second leaf, but it is facing in the wrong direction. While that pasted leaf is selected, I right click on it and a box appears. I want to click on Symmetry...
When I do, this little symmetry box appears.
I click on Flip H (Horizontal) and the leaf is facing the other way. I move it to the position I want, on the other side of the stem.
There is another way to Flip. Use the button shown at the top (green circle).
Now it needs the eyes. I draw a circle. By holding the CTRL key while I draw it, a perfectly formed circle is made. (I release the CTRL key before I release the mouse.) I draw a smaller circle inside that circle. I select both circles by holding the shift key as I click first on the small circle and then click on the large circle. I copy and paste, so I have two eyes.
I can flip the eyes horizontally or vertically if I want to get sillier looks, or whatever.
I finally want a smile before I color this apple.
I use the Bezier Curve tool (green arrow above). I draw one arc for the bottom of the smile. Stop while holding the mouse button (like putting the needle down and pivoting with the sewing machine) and then draw another curve off that end point to the point where the first arc began.
And finally I select the Color tab at the bottom of the Worktable and color the applique.
I hope this tutorial was helpful.
Leave a comment on my blog. It counts as an entry into the BIG Giveaway from EQ. Visit the other blogs listed below and your is another entry. This giveaway is now closed.
From the combined comments of all the blogs, ONE lucky person will be chosen
on November 1. The winner will be picked by random.org
But That Is Not All!
I have my own special giveaway for ONE lucky person! In keeping with the Autumn theme: this lovely bundle of fat quarters.
I will mail this fat quarter bundle within the U.S. If someone outside the U.S. wins, I have a collection of PDF patterns I have designed to email to you.
To Enter My Giveaway:
Your comment on my blog will count as one of the entries for the EQ7 program giveaway. PLUS, I will count it as an entry for my giveaway.
Earn a second entry for my giveaway by returning here on October 25 and leaving a comment telling me which of my applique designs you could possibly use in a project. I will announce my giveaway winner on October 28.
I must have a way to contact you. If you are a no-reply blogger, or do not have a blog, you must leave your email address in the comment. If I can't contact you, I will not be able to include you in the drawing. I do not accept anonymous comments. They go into my spam file! I will leave this contest open until 11:59 EST on October 25, 2013.
Please return tomorrow to see the final applique I designed and to find out what other projects I have to share with you.
Here is the schedule of bloggers:
October 21st
October 22nd
October 23rd
October 24th
October 25th