Showing posts with label binding. Show all posts

6/04/2019

How a Simple Sewing Day with Friends Can Energize a Quilter


Have you ever lacked ambition to get working on a quilt project or maybe finish some UFOs?

For the past few weeks I didn't have the excitement to work on my projects. I had so many things going on, and pulling me in different directions, that quilting was near the bottom of my to-do list (just ahead of pulling the garden weeds).

I hadn't seen two of my quilting friends since the beginning of May and decided I would invite them over for a sewing day. Last Monday I sent them a message and we were all available that Thursday.

Just a few days to plan, but easy enough with the 5 steps listed below.

1) FOOD: We were beginning at 10:30 A.M. so we planned a lunch. We each chose to bring something to share. Teri would bring fruit, Gloria chose vegetables and I would make chicken salad. (Bonus:All the ingredients I needed were on sale at our local grocery, so I bought them on Tuesday,  which happened to be senior discount day.) I made the salad the night before our sew day.

2) SEWING SPACE: We sew at my dining room table. I cleaned the parts of the house we would be using. (Cleaning the rest of the house cleaning could wait for another day.)

3) SUPPLIES: Make it easy for friends to tote just what they need for sewing. The night before, I got out the ironing board, iron, big cutting mat, rulers and cutting tools. I plugged in the extension cord and surge surpressor near the table.

4) PROJECTS: We could work on whatever we wanted to sew. I had a quilt and nine hotpads to bind. I got the supplies for the projects together the day before.

5) JUST BEFORE ARRIVAL: I took out the plates and cutlery for lunch, the counter-top would be the serving area.

When my friends arrived, we were able to get the machines set up and start our day of sewing fun. For 7 hours we sewed, talked, and enjoyed a wonderful lunch! The time flew by too quickly.

I got my projects done and Teri and Gloria got a good amount of larger UFOs going.


It was great to have some friends join me to sew. The preparation spurred me into action and my neglected projects were finished in a pleasantly short time.

Do you quilt with friends. How do you plan a sewing day?

I am linking up with Meadow Mist Designs Favorite Finish Monthly Linkup for May. Click HERE to see what others have finished in May.


12/18/2018

Quilting and Sewing Update

Quilting and sewing has been hit and miss for me. We are getting ready to remodel our master bathroom. This includes taking everything out of the bathroom and the closets that run between the bedroom and the bathroom. One closet area will become the new, larger sink and a larger linen closet. The small shower will be enlarged into the other closet. The plumbing will be moved.

To make up the lost space of one closet, I ordered an armoire online. It had to be assembled and since my husband was busy, I assembled it. I called him only to rotate and raise it so I could add screws on the back of the shelves. It was so large, I had to assemble it in the living room!


Here it is completed. I wanted a wooden piece that came close to matching the color of our oak dresser.

Consignment Shop Items

In between all the "hard work" I was able to sew five Pillow Book Totes for the consigment shop, The Yellow Window. I think these would make wonderful Christmas presents for youngsters. 


And Christmas treats are always a good choice, so I made some embroidered candy cane reindeer and Christmas tree pencil toppers.


Christmas Items

Daughter #2 said she didn't have a Christmas tree skirt for their tree. I sent her a photo of some fabrics I had in my stash. Texting between us, she chose 2 fabrics for a reversible tree skirt. All of them have some metallic paint in the prints. I found 1/3 yard of gold metallic fabric that would work for the binding (which I cut on the bias and sewed many pieces together!). 


It was dark in the house and I don't have a Christmas tree this year, so I took the photos outside around the deck umbrella pole.


I machine stitched the binding to the edges from one side, but hand stitched it to the other side so no stitches would show.


Mail

I got a small present from one of the originators of the Gridsters (an online quilting bee I belong to). It was a very fun, early Christmas present. Thank you, Elizabeth.


I am working on the blocks for the December Gridster Queen Bee. I want to finish them before the weekend. These are the colors she is using:


and includes some of Aneela Hoey's Little Apples fabric line from Moda.
I am working on some apples from The Quilter Community and the (center) leaf pattern from The Inquiring Quilter's Fall into a QAL. I will post them when I finish them. 

QuiltCon Entry Update


I also got an email telling my that my Quilt Con entry, Millie Restyled Again, for the Michael Miller 2019 Challenge did not make it into the show. The quilt is now posted on Instagram with the hashtag of #quiltconreject (with no sadness). If I hadn't entered, I would never have had a chance at being accepted. I will continue to make quilts for entry. And perhaps one day I will get a congratulations email!

Season's Greetings
Wishing you a wonderful holiday season and hope you have some time to sew or quilt during a quiet moment. 


4/18/2018

Sunny Quilt Day

It's been a busy day from the start!
It began with me fixing hubby's cell phone. It said the SIM card was not recognized and there was nothing on his network. I told him I would research what to do while he and his cousin went river fishing, hoping to catch a steelhead or two. I cut two tiny pieces of post-it note paper to pad the SIM card and give it enough pressure to make a connection with the inner workings of the phone. I also wiped the copper curcuit on the SIM card with a micro fiber wipe and a dab of alcohol to clean it. All is working well now! Glad his cousin has a cell phone with him.

The sky was dreary until about noon. The sun finally came out and the snow is melting! (OK, there is some rain coming in this evening and maybe a little snow over night.)

I'm sitting at the dining room table working on a pattern for an upcoming blog hop listening to the drip, drip, drip from the roof. But it is great to have the sun shining in the windows. 

The pattern is for the September Row Along hosted by Seams To Be Sew. The theme is My Happy Place. We are required to have the pattern ready and sent to our host in June. I am trying to work through EQ7 with the piecing and have not learned the ins and outs of the paper piecing printing in EQ. But if I can fix a cell phone, I'm sure I can figure this out, too.

I have this binding to put on a T-Shirt quilt that is a graduation gift. I'll press it and get the sewing machine to the dining room table, because this quilt is BIG! (75" x 84") This young man is tall. I used all the t-shirts his parents gave me. I am sure this quilt will cover his dorm bed.

I am following 2 blog hops.
I made sure I visited today's blogs for the Island Batik Alumni Ambassadors blog hop. A list of the participants can be found HERE.
And the other is a blog hop in which some of my bee mates are participating. They are using Simone's fabric collection, On You Mark  by Paintbrush Studio Fabrics. You can find a list of the bloggers HERE. Her fabrics are so fun looking and the projects that have been made with them so far are wonderful.
Thanks for visiting. I wish you a sunny day and hope you get time to craft.


11/01/2013

Four in Art Reveal

Today is the day of the Four in Art reveal of our first quarter projects. The overall theme was URBAN. Our first topic is "Maps." I can't wait to see how the other 7 members of the group have interpreted the topic.

I thought for quite awhile about how to make a 12" x 12" Urban map themed art quilt. I posted some thoughts HERE.  

As I looked at maps, especially older maps, I saw how a river was the important aspect of the city's development. My research also showed how parcels were divided when a city was established. In many instances it was one (or a few) land-owner(s) who planned the city. The parcels were surveyed and given to or purchased by others. The naming of streets and sections of the city show interesting histories. (A study for another time in a maps series topic.)

I finally decided on making a layout of part of a city map with the idea of "a river runs through it." So I present my art quilt:


I used two of my favorite colors: turquoise and lime. I wanted to reflect the need for a clean river, a healthy environment for creatures that depend on the river as well as how it can be used by the citizens. 

One of the things that I think makes a city a great place to visit or live is its cultural center. That lead me to applique some circlular shapes symbolizing gardens and art and/or entertainment. I included green areas to represent parks. The flag parcel represents government and is important to all cities.

All the pieces were backed with fusible then appliqued and topstitched with small zigzag. I used straight stitching to outline the roads. I used two layers of stitching for the roadways to make it show up. The roads stitching is the quilting through all layers. 


The binding is attached one side at a time. This is the same method I detailed in an earlier blog HERE. I used binder clips to hold the binding as I sewed it instead of the water soluble basting tape. 


I sewed corner fast fold triangles for the hanger. This was a trick I learned from Ami Simms website (here). I baste them in place before the binding is put on. I then put a small dowel in the two corner triangles and am able to hang the piece with one nail in the wall.   


I do not know yet what the next topic will be, but look forward to finding out very soon. 

More quilts depicting this theme of Urban/Maps can be found at:

Leanne of She Can Quilt
Rachel of The Life of Riley
Betty from her Flickr site
Amanda of What the Bobbin?
Elizabeth of Occasional Piece 
Carla of Lollyquiltz

9/19/2013

Wrap It Up with Binding

I went to an all-day sew this past Saturday. On-line I found a group that was meeting about an hour away from my home. I think it is wonderful how the internet can help us with so many things. 

Growing up I remember the difficulty involved in searching for information. I am astounded that my father (living in Michigan) in 1968 was able to search for our summer vacation experience-- sluicing for rubies in the Ruby Creek in Montana! This was a small creek, reached via a trail, not even a two-track road. But what a wonderful experience and he found all he needed to know without the internet.

But, I digress. The day was great and I made new quilting friends. In fact, I had met one of the ladies at the AQS Show this August. I did not know until she told me, via Facebook, two days before the sew that she was going to be there. 

I took what was on my "finish" pile. I had binding to do in order to complete some quilts. I sew bindings on from the back, turn them to the front and topstitch from the front. This allows me to see that I am keeping the stitching straight and even to hold the binding down. It allows the stitching on the back to appear like part of the quilting. And no flare ups of carpal tunnel in my hands.

So, these are the quilts I finished! 


I asked my daughter to take this photograph. She said she "really likes it" and said "it looks like chocolate at Christmas." So I was able to name this quilt: Chocolate at Christmas. It is a deep, dark chocolate brown color with white. I used the "Stack N Whack" method of cutting the kaleidoscope stars. 


This quilt I made following a pattern I got in the mail from a magazine company trying to sell me a subscription. I decided to try the pattern. If making this again, I would use Anita Solomon-Grossman's idea of using fusible on the area where the diagonal will be cut so I don't have to deal with the bias stretch in the cut blocks. 


This kite quilt is one I started about 2006. I drew my own paper piecing kite pattern. I did bobbin work to make the kite tails. I did the quilting this past spring on the Sweet 16 at Inspirations of Arts Studio


I posted the beginnings of this quilt a few months ago. The pinwheels were leftover blocks from another quilt I was working on. I had a longarm quilter quilt it with spirals. I am quite happy with it. It is a long toddler sized quilt. 


I began this wonky quilt back in the early 2000s. The border was most difficult to sew on. I used a pattern from a magazine, but I no longer know which one. This one was sent to a longarm quilter. I am glad to have finished it. 

And today I return to sewing the Persian Star Blocks for Bea's block swap. I want to get the rest of them finished. 

I am looking forward to taking time this weekend to view some of the Art Prize entries in Grand Rapids, MI. 

8/08/2013

Mug Rug Binding

I made another mug rug so I could take photos of the steps in binding it. 

Since the mug rugs are so small, I wanted to add the binding without mitering the corners. 

I used my trusty helper: 1/4" Water soluble basting tape. I made a quilt as you go log cabin-type piece and trimmed it.


BINDING
First I cut 1-1/2" wide binding strips from scraps.


From those strips I cut the end pieces the lengtht of the short ends of the mug rug. I cut the long edge pieces 2" longer than the length of the mug rug as shown in the photo below. 


I sewed the short ends on the back of the mug rug and then pressed the binding pieces out.


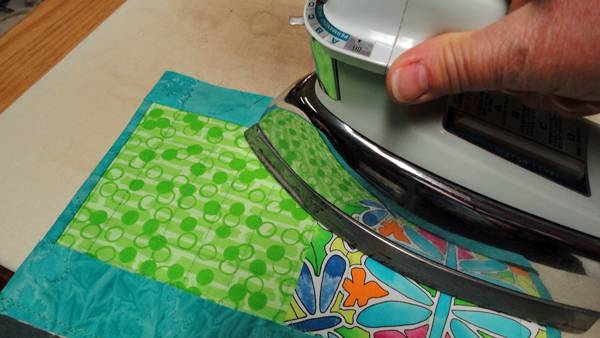
Now working from the front side, I pressed the binding edge to the edge of the mug rug (batting, etc.). I attached a strip of water soluble basting tape to the pressed edge and folded it onto the front of the mug rug (shown below with pins for illustration purposes).


I topstitched the binding from the front.  And on the back, the stitches look like they are part of the quilting, as you can see in the photo above. 


For the long binding piece, I lay it on the back of the mug rug so the raw edges are aligned and 1" overhangs each end of the edge. I then fold those 1" ends around to the front and pin.


I sewed along the entire length of these long sides.


The ends are "turned in" when the binding strip gets folded out from the backing.


I pressed the binding strips away from the backing and turned the piece over to work from the right side. 

You can see how the 1" ends get turned in. I press the binding in half lengthwise so the raw edge touches the raw edge of the mug rug (batting, etc.).


I attach the water soluble basting tape to the folded edge and press it in place and sew the binding from the front, so the bobbin thread finishes off on the back and blends with the quilting. The ends do not have raw edges and line up with the short binding strips. And the mug rug is ready to use!


I can think of some other treats to have with my mug of something, but today I only had a brownie. In fact, a really good brownie recipe is Chai Latte Brownies, which my daughter and I have made for a number of years.  Here is the link to the recipe.  Once I used half and half in the recipe because I wanted to use it up--and I believe the brownies were better.


8/01/2013

One Test Block Done

I finished the paper piecing test block.  I have a few things to tweak on how I construct the blocks to help with the pinning of the intersections so they aren't off as much as I see in this one. But here is my test block put together. I am happy that the size measures 12-1/2" x 12-1/2"!


MUG RUG from LEFTOVERS:

With the leftover pieces that I cut off the paper piecing I placed them on a piece of batting with the idea that I would do "inchies" as described by Angie Padilla on her blog HERE

After laying the pieces in a hodge-podge, I placed a piece of very light blue wedding tulle over the pieces on the batting, pinned and took it to my sewing machine. I used a metallic thread with a white/hollographic look to stitch all over the tulle to keep all the pieces in. This is when I decided to make a mug rug. I trimmed the sewn piece into a wedge form. Spray basted the back and added some leftover fabrics for a backing. I sewed some straight lines vertically to hold all the layers together.  Finally binding was added. I will post tomorrow how I did this--it was so easy!

Save your scraps for your own mug rug!