9/11/2013

Mapping The Way-Four in Art Project

I feel very privileged to have been accepted into the Four in Art on-line group just this past month. I am taking this membership quite responsibly. 

The theme for this year is Urban and the challenge for this quarter is Urban Maps.
I have done a great deal of thinking about this topic. How shall I quilt about maps in a 12” square space?

I could do a piece showing a city map with streets and work colors in to show types of land use: buildings, neighborhoods, parks, or all of it.

I could do a piece incorporating words found on city maps using stenciling, paints, stitches and such.

Should I show how a city developed by creating a sheer overlay of a present day map that can lift to reveal a dated map from a century ago?

Should I focus on new technology such as GPS mapping, or what about mass transportation maps?

Maybe I could do an abstract representation of a city map using a cut and slash method of quilt making.

Make a color study of a statistical map indicating population, poverty, etc.  

There are so many choices. I must narrow it down to two or three and get working on it, since November 1 will be on me in no time.

In my research, I discovered that from the 14th Century on, mapmakers used a combination of methods to produce a pictorial city map. They included painting, sketching and engraving. I see the making of an art quilt piece today is similar to what mapmakers have been doing for hundreds of years.

I have learned that a pictorial map was intended as a decorative object and communities felt a sense of importance if one was made for them. Maps were most commonly drawn from the perspective of the cartographer, creating a perspective view rather than an aerial view, which did not allow a person to see all there was in the city. Leonardo da Vinci improved on mapmaking by drawing plans of a city layout and building outlines. These maps moved away from pictorial oblique maps toward outline plans. In the 18th Century, balloons tethered above London helped cartographers see and record the layout of streets and roads although the wind posed some problems.

A few books I found helpful were:
Understanding Maps of Our World: Maps and Cities, published by Gareth Stevens Publishing, 2010
The Penguin Historical Atlas of North America, by Eric Homberger, 1995, Penguin Books
One Planet Many People: Atlas of Our Changing Environment, published by United Nations Environment Programme, 2005  NOTE: This book is spectacular for the photography. It is an oversized book and very heavy but fascinating.


As I was investigating the topic on the internet, I came across the webpage for Valeria S. Goodwin, who designs cartographic, architectural, and abstract quilts. She written a book Art Quilt Maps: Capture a Sense of Place with Fiber Collage-A Visual Guide that C & T Publishing has just released. It looks like a book I must view!

9/05/2013

While sewing the paper pieced blocks for Beaquilter's exchange, I discovered a way to get the seams to nest on two units making the alignment of the fabrics come out nearly perfect. 

Here is what I did: 

On the paper piecing pattern paper, I re-numbered the sections that will be joined first. By doing this, the seams on one side will be sewn going in an upward direction and the seams on the other side will be sewn in a downward direction. When I pinned the seams at each line intersection, the seams nested because they were laying in opposing directions. This made the points and lines on the block look nearly perfectly matched. 

When sewing two of these joined blocks together, I removed the paper from the stripes on one corner and pressed the two outside seams toward the center. This allowed me to match and nest those seams much easier. I was not able to press the seam of the longer strip toward the center because it created just too much bulk. 

Here is the 7th block I have finished for the block exchange:


An Internet Tip on Using the Ladder Stitch to Close Seams

While exploring some websites and blogs, I found a tutorial on Melly and Me that showed how to sew a seam closed on a stuffed animal. This could be used anywhere we have an opening from turning 2 sewn fabrics right sides out. I found the way she started the stitching with no tied knot to be very nifty. I am going to use non-tie knotting technique when sewing seams. 

Thanks for stopping and have fun sewing.


9/04/2013

August's Summary

August has been a busy month for me. My husband and I took a trip for our 30th anniversary to see the Pictured Rocks National Lakeshore in Michigan's Upper Penninsula via the cruise. It was spectacular. I took many photos thinking I would incorporate some into quilting projects. I don't know what those will be yet, but I will let the creative juices simmer for a few months. 


AQS Show Grand Rapids, MI I attended the AQS Show in Grand Rapids, MI, on August 14 -16. I took two classes with Bill Kerr which were spectacular! The first was "Rediscovering Your Stash." He has us looking at our fabric collections now in a new light. I am so pumped to use his methods of combining fabrics in new ways that my previous idea of shedding some of my untouched fabrics from a few (cough, cough) years back may not happen. 

We all brought fabrics to class and chose one to bring to the circle. Bill paired two fabrics and those two people had to work through the stashes they brought to come up with a palette.  The first photo below shows the palette my partner and I developed. Bill is pointing to the fabric I brought to the circle. My partner's contribution was the fabric in the bottom left corner. The next 3 photos show how my partner and I combined the palette to each make a sampler quilt. 
Bill Kerr discusses our choices. 

My peices cut for sewing.
My quilt sample.

My partner's sampler.
Samples from all the participants as we discuss them.

The second class he taught was "The Role of Color in Your Quilts." I have tried to learn about color in the past: color wheels, etc. but never could understand how to work with it in quilts. Finally, I get it! The way Bill taught really helped me see how to use, choose and work with colors in quilts. He is a wonderful teacher, very interactive, gets the students discussing, talking, doing!

"Thirty-Nine & Holding"  was the class I took with Klaudeen Hansen. She taught us her "fudge factor" piecing and the blocks we made were quite easy to make. Sharing fabric with others so we all had a great variety was fun. 

HEXIESI followed the Hexie Queen blog hop during August.  In fact, out of necessity, I began sewing hexies about a week ago. I had a bout of vertigo and could not use my sewing machine or bend my head down to rotary cut fabric. I got out a small box of fabrics, scissors, needle, thread and the new Fiskars Hexagon cutter I bought on my way home from the quilt show. (Thank goodness they were all in one place so I could get to them without much discomfort.)  I was able to work with them while sitting on the couch. I am not sure what this is going to become, but here is what I made so far:


CLUB EQ CHALLENGE

I designed a quilt for the Club EQ Challenge for August. This is the link if you'd like to see it: Stars All Around Quilt. I actually think I will try making it. (Can't believe I am saying this after making two-colored blocks similar to these for my daughter's queen-sized bed 3 years ago and having a doozy of a time sewing them.) But I do like the quilt, so I have to give it a go. 


Quilting: Cheaper than Therapy
I saw the quote above on the Quiltmaker website. I think they have some very cute quotes. And as of today, I am using my my machine again! Sewing makes me happy. 

I am working on a star block exchange through Beaquilter's blog.  I have 6 of the 12 blocks completed. They are paper pieced. After making a few of them, I discovered something that made it easier to align and match the intersecting strips in the 8 pieces. I will blog about that tomorrow. Here is a photo of the 6 I have done. Each of the 6 participants gave their color preferences, so we are working with a number of colors.


8/08/2013

Mug Rug Binding

I made another mug rug so I could take photos of the steps in binding it. 

Since the mug rugs are so small, I wanted to add the binding without mitering the corners. 

I used my trusty helper: 1/4" Water soluble basting tape. I made a quilt as you go log cabin-type piece and trimmed it.


BINDING
First I cut 1-1/2" wide binding strips from scraps.


From those strips I cut the end pieces the lengtht of the short ends of the mug rug. I cut the long edge pieces 2" longer than the length of the mug rug as shown in the photo below. 


I sewed the short ends on the back of the mug rug and then pressed the binding pieces out.


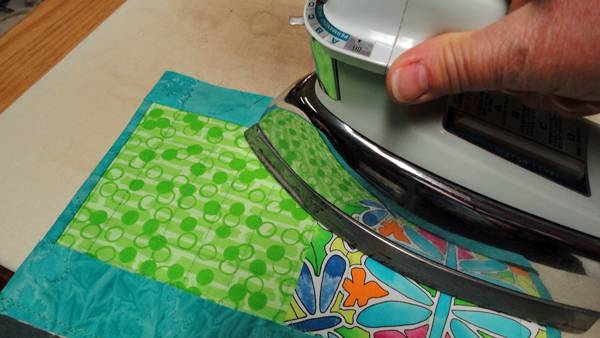
Now working from the front side, I pressed the binding edge to the edge of the mug rug (batting, etc.). I attached a strip of water soluble basting tape to the pressed edge and folded it onto the front of the mug rug (shown below with pins for illustration purposes).


I topstitched the binding from the front.  And on the back, the stitches look like they are part of the quilting, as you can see in the photo above. 


For the long binding piece, I lay it on the back of the mug rug so the raw edges are aligned and 1" overhangs each end of the edge. I then fold those 1" ends around to the front and pin.


I sewed along the entire length of these long sides.


The ends are "turned in" when the binding strip gets folded out from the backing.


I pressed the binding strips away from the backing and turned the piece over to work from the right side. 

You can see how the 1" ends get turned in. I press the binding in half lengthwise so the raw edge touches the raw edge of the mug rug (batting, etc.).


I attach the water soluble basting tape to the folded edge and press it in place and sew the binding from the front, so the bobbin thread finishes off on the back and blends with the quilting. The ends do not have raw edges and line up with the short binding strips. And the mug rug is ready to use!


I can think of some other treats to have with my mug of something, but today I only had a brownie. In fact, a really good brownie recipe is Chai Latte Brownies, which my daughter and I have made for a number of years.  Here is the link to the recipe.  Once I used half and half in the recipe because I wanted to use it up--and I believe the brownies were better.


8/01/2013

One Test Block Done

I finished the paper piecing test block.  I have a few things to tweak on how I construct the blocks to help with the pinning of the intersections so they aren't off as much as I see in this one. But here is my test block put together. I am happy that the size measures 12-1/2" x 12-1/2"!


MUG RUG from LEFTOVERS:

With the leftover pieces that I cut off the paper piecing I placed them on a piece of batting with the idea that I would do "inchies" as described by Angie Padilla on her blog HERE

After laying the pieces in a hodge-podge, I placed a piece of very light blue wedding tulle over the pieces on the batting, pinned and took it to my sewing machine. I used a metallic thread with a white/hollographic look to stitch all over the tulle to keep all the pieces in. This is when I decided to make a mug rug. I trimmed the sewn piece into a wedge form. Spray basted the back and added some leftover fabrics for a backing. I sewed some straight lines vertically to hold all the layers together.  Finally binding was added. I will post tomorrow how I did this--it was so easy!

Save your scraps for your own mug rug!