12/17/2017

Gift Card Holder Tutorial

Last week I made gift card holders for the holidays. See the post HERE.
I used a coaster design from EmbroideryIt.com 
I wanted to share the steps I took to make a pocket on the back of the coaster to hold a gift card. I wanted them to be used as ornaments in the future, so I included a ribbon for hanging.

The photos show the steps I took to make these.
1. Finish the front of the coaster embroidery. Leave it in the hoop.

   
2. Cut the felt backing piece about 1/3 of the way from one edge.
   
3. Turn the hoop over to see the back side.
  
4. Place the ribbon ends into the embroidered area, below the stitching line. Place tape over the ribbon, 1/2 inch above the stitched line on the stabilizer (see larger image). Line up the larger felt backing piece along the bow line.

   
5. Align the top 1/3 of the felt backing to the bottom section and tape them together in the middle so there is no gap between them. Then tape the sides where the cut lines meet. Finally, tape down the corners.
  
6. Place the hoop back into the embroidery machine to finish the final edge stitch that holds the front and back together. Remove the embroidery from the hoop and carefully remove the tear-away stabilizer.
  
7. Trim the sides and bottom 1/4 inch from the stitched border. Trim the top back edge, without cutting the ribbon, by folding the front piece of felt and the ribbon down to the front of the embroidery. Trim 1/4 inch beyond the stitched edge. 
  
8. Trim the front piece of felt 1/4 inch from the stitching, making sure to fold the ribbon down to the back keeping it away from the scissors. 
  
9. That's it. Finished and ready for gifting. 


12/11/2017

Gift Card Holders

A short post to show the test embroidery I sewed today.

I am going to give gift cards to some people this season. Embroidery_It is having a Live Facebook embroider along tomorrow at 2 PM EST to make these pretty coasters. I wanted to try one today. It was my test. The Floriani threads are lovely and the stitching around the applique pieces is very nice.
 As you might notice, I used red thread for the first edge stitch. The final edge stitch I used green. Not a good look. I'll correct it with the gift batch.

When I taped the back felt pieces, I put it over the stitching area and it is stitched in, not to be moved!

That's why I make a test piece.
I test quilt blocks before I make the actual blocks, too. I want to be sure that size and pattern work out properly.
Do you make tests on your projects before going too far with the final project?

12/07/2017

Using Scraps

I save scraps! I have for years: I guess I'm a scrap addict. I wish I didn't save so many. I have a tough time parting with those pretty little scraps. Those trimmed triangles obtained after sewing on the drawn, diagonal line to create a triangle corner on a block unit are maybe the most prolific! (Perhaps that sewing shortcut should not have been developed.)  While tidying up after sewing the mystery block units the other night, I decided I would sew the triangles together and make something. (It is a mindless task and there were only re-runs on TV that night.)

I chain-pieced these tiny triangular corners with 1/8" seam allowances and smaller stitch length. The chained triangles could have decorated the Christmas tree! But I really wanted to do something creative that came from my mind's eye. I decided to see where I could go with what I had.

Piled on the cutting mat:

I pressed them open but did not trim them. I cut 2-1/2" strips (of some lovely dark blue fabric I had near me) on a 45 degree diagonal (so the dark blue fabric edges would be on the straight of grain). I sewed the triangle units to that (green lines)
as in the photo below:

I cut along the red lines below and pressed the units open (toward the dark fabric).

I trimmed them all to 2 inches square. I got 72 little blocks to work with. Sewing the units together with some sashing strips and cornerstones gave me this 26 inch by 14 inch table topper that I will quilt another day. 

I plan to gift it to someone.
Thanks for visiting. What do you do with your scraps? Do you save only a certain size? How do you store them?

12/05/2017

Mystery Quilt Progress

Today was a sewing day with my friend Teri. It was a productive day for both of us. Teri completed an 16" origami pillow using Christmas fabrics. I found a smaller sized block like it HERE, at Sewn Up, where there is a video tutorial. Teri's was so cute, I want to try one. By changing the size of the pieces, it could be made in any size.

As for my accomplishment, I caught up on the first 3 steps to the Magnolia Mystery Quilt at Meadow Mist Designs. I will be ready for the December 7th clue release! Cheryl's Mystery Quilt designs have been so  has interesting and appealing in the past years that I joined the Meadow Mist Design Facebook group. The photos others have posted showing their progress made me decide to get started on my quilt. My finish for a good long day of sewing is shown below. (The photo was taken in the evening; I apologize for the lack of vibrancy.)

If I keep up with this quilt, I will be prepared to work on the Merry Mayhem Mystery quilt on New Year's Day. I have participated for 4 years. I enjoy getting the clues each hour and working on the quilt while my husband watches football.

Have you made a mystery quilt  in a class or online? How did you like the process?

12/03/2017

Unplanned Hiatus

The last few weeks have been void of sewing. I want to get back to sewing. I think I am somewhat prepared to begin again.

As my heading states, I was on an unplanned hiatus. The definition being "a pause or gap in a sequence, series, or process."

Beaquilter posted about her re-organizing achievement. I have needed to organize my sewing area for, can I say years? So I began with a room that accumulated too many things. And I am embarrassed to show this' but all the more to encourage me to organize. 


I know my short-comings: too many ideas and projects bouncing around in my head, as well as in my sewing area! I save scraps--those will be going, since every project creates scraps! I have a bit more to tidy up and some boxes to go through, but this is what it looks like now. I am fairly happy that I can sew again. 

I knew I would have to stop sewing for a week, or maybe more? Yes, it turned into a longer time than I thought. I did have a week's worth of interruption which was also unplanned. Our daughter and son-in-law signed the final papers to become new home owners. They went to the house 30 minutes after signing to find 2 inches of water filled the basement! I packed the car with all I could think we would need for a clean-up and drove the 2.5 hours to get there. My husband came the next day with more tools to help remedy the situation. 

This began 2 days before Thanksgiving. She was planning on having both sets of parents for a dinner after they moved out of the apartment. We worked moving them, and on the basement, taking time for a very tasty dinner that our daughter cooked on Thursday. The sump pump had failed before they got the paper signed and they had to discover it! A new pump was put in on Thanksgiving. We were all grateful a store was open that they could purchase it. The guys put it in and it was working well. Here are a few photos of the clean-up. My husband and I stayed until Monday, almost a week.

They vacuumed the water that covered the floor. 
They had to take out the carpet and padding in this one room. Even after they vacuumed it twice, it was still soaking wet.
They cut 24 inches of the wallboard out from the floor up because 12 inches had soaked up the water. Opening the walls up helped it dry. They had fans and a small heater to help dry it. 

I did get  some sewing done now that I am home. I had some orders for potholders and some reindeer candy holders. 


I hope you are having a good week and month!


11/09/2017

Christmas Decorations

This past week I worked on some Christmas decorations using the embroidery machine. I decided the more things I made, the better I would get using the machine. So, candy cane holders were my first items to make. 

The bows are very easy to make and available from the EmbroideryIt Etsy Shop HERE. Look under candy holders to see all the others she has. I am going to work on the gingerbread man holders today. The horse pattern was from Embroidery Garden  and was fun to make. Adding these to the Folded Star Ornaments I showed in the last post will give me quite a few ornaments to put up for sale at The Yellow Window.

Do you make ornaments for Christmas trees or package decorations? Which one(s) was the most fulfilling to make?


11/04/2017

Apple Cake for Sewing Day

Thursday was Friends' Sewing Day with Teri and Gloria at my house. The hostess bakes a mid-morning snack. I had apples. I did a Google search using "easy apple cake." The recipe I chose was Easy Apple Cake HERE.

I made it the night before and had to have a taste. It was moist and tasted very good.


Lunch was Cabbage Roll soup that Teri made...and was it good! 

We did more chatting than quilting, but that is part of getting together. Gloria got the binding sewn on to her quilt and took it home to hand sew it to the back. I forgot to ask her for a picture. It is a double bed-size, huge and  colorful Lemoyne Star on a black background. Teri layered a small fall panel and did some free-motion quilting around the scarecrow.

I had bindings to sew to potholders. Eight simple potholders that I quilted with serpentine stitching on the diagonal after layering backing, front and 2 layers of batting. 

I finished 3 Michigan potholders. 

Today, I watched a video at Nancy's Notions on how to make folded fabric star ornaments using heavyweight interfacing (which I had ordered last week and it arrived today). The video is located below the picture of the ornaments in a small box. Last year I had tried making one of these ornaments using batting and folded fabrics and was a bit frustrated. The method shown in the video made it so easy. I even used my circular cutter to cut the interfacing!

And I got 2 done (only need buttons in centers) in about 20 minutes. I'm planning to make more for Christmas decorations. And what a way to use up scraps and leftover pieces. I even figured out how to make them different sizes.


What have you been crafting?

11/01/2017

Four-In-Art Challenge Reveal

Illumination and Light, the theme for the 4th quarter reveal of the Four-in-Art challenge this year. Our online group has been creating quilted projects this year under the general theme of LIGHT, with ILLUMINATION as the sub-theme for this quarter. 

I found this sub-theme tough. When I searched the word "illumination," the medieval art of illuminating books was foremost in the results. I was thinking along the lines of light bulbs shining on a performance stage, a book while reading, a window, and many more concepts. 

I chose some photos I had taken. I liked the sun shining on the tops of trees. I really liked the lighthouse at night, and an evening sunset as we finished fishing on Lake Michigan. 


My idea was to use sun and trees. Using a shimmery bridal fabric I combined techniques I learned in classes from Ann Lovelace and Lenore Crawford


Illuminating Sunlight is the name I gave my quilt. The use of the bridal fabric gave it the illumination I imagined.

This is the final reveal for the Four-in-Art quilters' group. The group started 5 years ago. I joined in 2013. The founders are looking toward new quilting adventures. I have enjoyed working with this wonderful group of quilters and on the quarterly challenges. I have gained friends. I have tried new quilting techniques. I have learned so many concepts of art and quilting as we have shared our pieces over the years. I am thankful to have been a member of Four-in-Art quilt group.


Please visit the other Four-in-Art members' posts listed below. 


Nancy (That's me, you are here!)


But there is good news!

A few of us have signed on to a new quilt art group started by two of our members. 'The Endeavourers' will be revealing their first theme projects on February 1, 2018, with 14 quilters in the group. I look forward to this quilt art group as we show how we "embody the spirit of our quilts." I hope you will stop back to see what I have to reveal on February 1! 


10/25/2017

Pattern Winner Announced

Alas, the blog hop Enter If You Dare has ended. It was so fun visiting the bloggers' posts to see what they had made for Halloween. Each of the projects was amazing. I got so many ideas! I hope you were able to choose a few ideas to make for future Halloweens. 

Thank you all who visited my blog and my Facebook page, too.

Thank you to Marian of Seams To Be Sew for organizing this blog hop. I am looking forward to joining her next hop project! Many thanks, also, go to the sponsors, Fat Quarter Shop and Timeless Treasures for their wonderful giveaways! You can check Seams To Be Sew to see the winners. 

I had a giveaway of my own. Rafflecopter randomly chose a winner today. Edith G. entered and left a comment to my request: "tell me what color scraps you would sew together and what you would fuse onto that "new" fabric." 

I will email Edith the three patterns (pictured below) I have designed. All are available at Patternspot.com along with other patterns I have written. 

 Woven Fabric Christmas Stocking

 Wavy Panel Pattern

 1-2-3 Sew Easy Throw Quilt


The comments to my question were marvelous ideas. I encourage each of you to try the ideas you wrote. I think you will all have wonderful quilted items. And as one person mentioned: "It is a free quilt" because you are using scraps you might have tossed!

Happy Halloween!

10/19/2017

Halloween Enter If You Dare Blog Hop

"It's not safe to venture out 
as goblins and witches are all about 
on Hallowe'en." (unknown)

 Although Halloween is still 13 days away,
I invite you to 
"Enter If You Dare" 
and see what treat I have in store 
for your quilting pleasure today. 

Marian from Seams To Be Sew had invited quilters to join her in a blog hop where we would share 
with you information about Halloween quilty item(s) we made. There are 19 bloggers participating in this blog hop.

Halloween is one of Marian's favorite holidays
so she is providing a free pattern each day on her blog.
The patterns she provides are free for only 24 hours!

Plus two wonderful sponsors have offered giveaways. 
Timeless Treasures has 5 lovely bundles of Fat Quarters (one for each day)
 and 
The Fat Quarter Shop has an amazing $75.00 gift certificate to give away during this event.

I also have a giveaway I am providing to one entrant
It is PDFs patterns for 3 of my own patterns. 

All the giveaway details are found at the end of my post. 


))))))))))))))))))))))))))))))))))))))))))))))))))((((((((((((((((((((((((((((((((((((((((((((((((((

MY  HALLOWEEN SHARE
is a scrappy table runner.

The backing is some fabric from my stash.
I had just enough for the back. 

AND THE FRONT

I wanted the Jack-O-Lantern faces to appear as if they are floating 
on the table runner in a ghostly manner. 

HOW I DID IT:

This project came about after I cut all my orange scraps 
into various quilt pieces using my Accuquilt dies. 
I sewed the leftover pieces together this way and that way,
forming 4 (somewhat) square blocks of "new" fabric.
I trimmed these "new" fabric blocks to 12" squares and sewed them together.
The table runner is 12" x 48". 
I fused Steam-A-Seam Lite to the back of black fabric
and cut out shapes for Jack-O-Lantern eyes, noses, and mouths.
They were fused to the scrappy orange background. 
I layered the backing, batting and top and quilted a pumpkin shape 
around each of the Jack-O-Lantern faces, adding a stem as I came to the tops. 
I stippled the space around all the Jack-O-Lanterns. 
I added some ridges, like pumpkins have, to the inside of the Jack-O-Lantern outlines. 
The binding is black fabric.

I like using all the scraps of fabric I accumulate from quilting. 
This project has given me ideas for using 
those tiny leftovers from Accuquilt die cutting for 
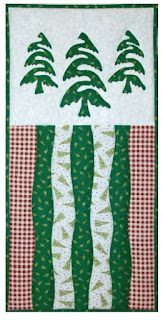
green table runners with flowers flowing along it,
blue with stars, or sea shells and starfish, 
red with black polka dots,
and I am sure more will come to mind! 

Now for the giveaways! 
There are Giveaway Rules to read at the bottom of this post for all who enter.
Timeless Treasures October 19 a Rafflecopter giveaway

I have a giveaway of my own.
PDFs of 3 of my own pattern designs.
(Please remember to leave an email so I can
contact you if you are chosen to win the giveaway!) 


Click the Rafflecopter below,
Please leave a comment, telling me what color scraps you would sew together and what you would fuse onto that "new" fabric. Then click the button that says "I commented." 
I will announce the Rafflecopter winner at the end of the 
ENTER IF YOU DARE blog hop.

Please visit the others participating in this blog hop.

Here Is The Schedule
Blog Giveaway Guidelines
  • Please take the time to read it.
  • Giveaways offered by sponsors are assigned to the various bloggers for their featured day.
  • You'll have to visit the blog or the featured blog to enter the giveaways.
  • All winners will be announced on October 25, 2017.
  • You must give a valid email address when you enter the giveaways, any email returned to me, loses the ability to win automatically.
  • Winners are expected to pay shipping costs for the product they won.
  • You are given 3 days to answer the email, if you do not answer within 3 days a new winner will be drawn. Check those spam/junk mail folders, you may miss that winning email if you don't do so because there are no exceptions to this rule.
  • If you are notified that you are a winner, in most cases, you will need to provide your name, address, city, state, zip code, country, telephone number, and email address.
  • In some cases, you will be asked to comment on the blog to enter the giveaway... do the right thing and thank them for the time it took to create the pattern, thank them for the pattern and...
  • Thank the sponsor by buying their products for the giveaways. This helps them continue to offer great prizes for these types of events. You can also comment on their social media pages. Even if you don't win, letting them know you love their products is a huge incentive and they really do love hearing from you.
  • No purchase whatsoever is necessary.
  • You must be 18+ in order to win a gift.
  • You are responsible for claiming and paying any tax owed on the value of any gift that you win. Prizes valued at $500.00 should be claimed.
  • Odds of Winning a prize are based on a total number of rafflecopter entries during each week and in total for all giveaways.
  • This giveaway is void where prohibited by law.
  • Participating bloggers may enter any of the giveaways.
  • The word giveaways in the rules and guidelines are also known as sweepstakes.
  • Whether or not you read the above, the rules for giveaways are in place to protect everyone. I do not want to hear you didn't read them, they will be posted on my blog daily during each featured day. There is no excuse for not reading them.