4/29/2013

Distracted by Scraps

I began tidying up my sewing area. I had a pile of scraps from the past month that needed to be tended and I have become distracted for the past day. I cut scraps into usable size squares or strips and put them into boxes by size. The other pieces and triangles are usually placed in a box for making "new fabric." I have been making "new fabric" for the dog quilt for our daughter's dog. I decided that I would begin making some more "new fabric" today since I had the urge to sew but not start a new project. The pile of scraps is gone now and this is what I have in "new fabric": 

The scraps
Chain sewing any pieces together


Sewn, ready to trim
A rough trim is good enough.


Sections sewn, ready for a squaring up 
This I do not save. I know a place that takes fiber scraps for recycling.

So that is what I do with my scraps. Now that they have been taken care of I am ready to start a new project. 

I wanted to let you know that there is a Blog Tour for the Quiltmaker’s 100 Blocks Volume 7, which will be released May 7, 2013.  I have purchased the magazines as they come out and am very pleased with what is offered. But the chance to win the new one would be great. There are many great ideas on the blogs. Check them out and perhaps you will find a new idea to use in your next project. 
joinforblogtour7 95 Spread the Word for a Chance to Win


4/27/2013

Blog Hop Winners

I have a great time during this blog hop. Thank you Bea Lee and The Electric Quilt Company. And of course a BIG thanks to all of you who hopped along with us. With no further ado, the winners are: 

The EQ Quilting Designs Volume 3 CD-ROM: 


And the Vera Bradley tape measure: 


I will contact these winners via email and mail out their prizes.

Check back often. I will have some other free patterns atleast once a month, mostly designed in EQ, more tips and ideas. 

I leave you with a cute quote I saw the other day: 
Quilters never cut corners.
and the link to a PDF from Patrick Lose that was on my Facebook page today. His Facebook post began, "I say this all the time but I have to say it again because I just had to deal with the result of someone doing this - STOP CUTTING THE CORNERS off of your quilts when you're binding them!!!"
Well, I sure wanted to know what happened. I read and discovered that he sews the corners of his bindings just like I do. So I share with you: Binding with Patrick's Perfect Corners.


4/26/2013

We Have Just Begun

While I want to say, "It is over," I really think it has just begun. What a fun blog hop this was for the past week. I hope everyone enjoyed it as much as I did. I cannot tell you how many new things I have learned. I read comments on the blogs and learned many things from the visitors as well. Thank you all. I will draw the winners of the two giveaways on April 27, 2013, so cross your fingers!

I am going to think about how I approach my blog so that I can share with followers, and  those who chance upon this blog, things I am doing with EQ7 and EQStitch. I found this free blog planner designed by Amy Locurto that I am going to tryout for organizing. I am also signed up to receive emails from Interweave and lately they have announced a variety of webinars that have given many ideas for building blogs, website, taking photos of one's art (quilts, crafts, etc.). Visit the store site and type "webinar" in the search box. After registering it is always accessible for review to remember. 

My projects await me, but I will be back next week with many new things to post. 
Again, thank you for visiting and I hope many of you will send a photo of the snail sewn up as an applique block. I will post them on the blog.


4/24/2013

Fun with EQ7


First of all I have learned so many things from the EQ Applique Animal Blog Hop during the past few days. I am going to have to devote a certain time each day to working on these tips, tutorials and lessons-something like going to school. Thanks to all the participating blogs. You have 2 more days to visit the blogs to see what you may have missed. Don't forget each blog has a giveaway, too. 


I got an email today from The Electric Quilt Company today telling about their Summer Drawing Series which begins May 1.  I am in, are you?  It sounds like it will be exciting. There is more information on their website. 


As I mentioned the other day, I have been experimenting with the SERENDIPITY feature of EQ7.  So I thought I would show a few things that this feature does. Try it and see how you like it. 

1. Draw a block using the Easy Draw+Patch Draw choice. Color it and add it to the Sketchbook. 

2. Choose BLOCK>SERENDIPITY> and then select one of the choices to change or add to your block.

3. Framing the block gives the attic window effect. Think of using a fussy cut block with a picture or adding a photo block that can be framed. 


4. Tilting Block is fun. You can do lots with these blocks. Change the angle of the tilt, rotate the block inside the tilt. How cool. 


5. Merging Blocks adds a new dimension. 


6. Clip & Flip is fun because you can change the position of the sections of the block to create new blocks. And when the new blocks are put into a quilt, the look is totally different. This is serendipitous especially with the random roll of the red die.


7. Shrink & Flip places the block of choice into 4 frames and then it can be flipped in various configurations, of which some would make lovely quilts. 


8. Kaleidoscope block is my favorite, but I am partial to kaleidoscopic blocks of all kinds. 


9. Fancy Star Block gives choices of star points (5,6,7,8,9 or 10) and allows the incorporation of blocks into the star points. It can also help with speedy Lone Star designs and more. 


This of course, is the tip of the iceberg in what is possible with the Serendipity feature. I hope you will try it and enjoy the outcomes. 

Don't forget to visit the in the blog hop. They are listed in the schedule below: 

EQ Appliqued Animals Blog Hop Schedule

Monday April 22nd
Seamstobesew (Summer Animal)
Freemotionbytheriver (Critters and Bugs)
Sewincrediblycrazy (Critters and Bugs)
Beaquilter (Summer Stuff)

Tuesday April 23rd
Kissedquilts (Summer Animals)
Seamstobesew (Critters and Bugs)
Funthreads (Summer Stuff)

Wednesday April 24th
Funthreads (Summer Animals)
Patchworkbreeze (Critters and Bugs)
Beaquilter (Critters and Bugs)
Sewincrediblycrazy (Summer Stuff)

Thursday April 25th
Beaquilter (Summer Animals)
Janesquilting (Critters and Bugs)
Seamstobesew (Summer Stuff)

Friday April 26th
SewCalGal (Critters and Bugs)


My Day to Share

WELCOME! 
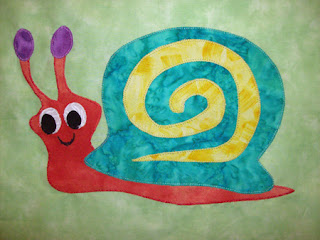
So glad you stopped. I hope you like my Applique Snail. I had such fun making this pattern. 


 Click here to download the PDF pattern file. 

Here are some of the steps and things I encountered while making the snail, along with a few tips. 


Cut the backing fabric 13" square. You will be able to trim after the snail is appliqued down. Fold into fourths to find the center and help with centering the snail. 

Choose your snail fabric colors. Trace the templates to the back of Steam-A-Seam 2 Lite. Cut outside of the drawn lines. Press each adhesive piece to the back of the corresponding fabric.  Trim on the drawn line. 
Using a teflon pressing sheet helps in these steps. 


I used a short, small zig-zag stitch around the yellow spiral. I had to tear the backing from the adhesive so I made a slit with a straight pin.
I zig-zag stitched the eyes in place before placing the orange body on the background fabric. 


I centered the snail. Remove the shell and purple antenna.


 Zig-zag the orange body down. 


As I sewed, the adhesive started building up on my needle. 


I bought these tiny swab packs and use the felt wipe to get the adhesive off the needle. They last through about 10 minutes of sewing.


Add the shell and the purple antenna. Finally trim up the background to a 12-1/2" square.

If you make the snail, send me a photo. I would like see how each of you interpreted it and I will post them in an up-coming blog.

THE GIVEAWAY Has Ended!
I have one giveway from EQ. They were so kind in providing me the Quilting Designs Volume 3 CDROM for one lucky blog hopper visiting my blog.
I ask that you leave a comment telling of one fun summer activity in which you like to participate.

I have a second giveaway that I hinted at in my April 15 post. Here it is: A Vera Bradley tape measure (60") for your purse. 

If you are interested in the giveaways, I must have a way to contact you. (1) If you are a no-reply blogger or do not have a blog, you must leave your email address in the comment. If I can't contact you, I will not be able to include you in the drawing. (2) I do not accept anonymous comments. They go into my spam file! (3) I will leave this contest open until 11:59 EST on April 26, 2013. (4) Only one comment per blogger, please. 

One winner for the Quilting Designs CDROM and another winner for the tape measure will be selected on April 27, 2013. 

I hope all of you are enjoying this week's blogs. And thank you, Bea, for organizing this event. And thanks to EQ for providing giveaways.


EQ Appliqued Animals Blog Hop Schedule


chick block2
Here is the Schedule for the 
EQ Appliqued Animals Blog Hop
With these fun sub-categories:
Summer Animals
Critters and Bugs
Summer “Stuff”


Monday April 22nd
Seamstobesew (Summer Animal)
Freemotionbytheriver (Critters and Bugs)
Sewincrediblycrazy (Critters and Bugs)
Beaquilter (Summer Stuff)

Tuesday April 23rd
Kissedquilts (Summer Animals)
Seamstobesew (Critters and Bugs)
Funthreads (Summer Stuff)

Wednesday April 24th
Funthreads (Summer Animals)
Patchworkbreeze (Critters and Bugs)
Beaquilter (Critters and Bugs)
Sewincrediblycrazy (Summer Stuff)

Thursday April 25th
Beaquilter (Summer Animals)
Janesquilting (Critters and Bugs)
Seamstobesew (Summer Stuff)

Friday April 26th
SewCalGal (Critters and Bugs)

4/23/2013

Progress Today

I am late in posting today.  I have been busy with a number of projects. I am working with the fundraising group at church. I pressed Heat N Bond to the back of floral fabrics, traced teacup shapes on the paper side of the Heat N Bond.  These will be pressed to the front of the invites for the Plant Swap and Tea Social we will be hosting. These have not been pressed down yet on the cards, but I think they will look sweet.


I then located quotes about plants and flowers and tea-time for table decorations. The last thing was to make a prototype for the fabric pot covers we will make to decorate the tables. I have to work the size just a bit more to fit the potted plants. I have a photo below showing the prototype with some flowers put in to give an idea of what it may look like. I need to sew the petals a little shorter than I did. When I get this worked out, I will post a tutorial of the steps and dimensions. 


As to tomorrow's blog hop, I have the blog ready to post at midnight tonight. I thought about the blogs from Monday and Tuesday and decided I would add something about EQ. So, on Thursday, I will show you some of the things I have been exploring with the SERENDIPITY feature, I will take some screen shots to show you just a little of what can happen with the various choices. So come back and see some of the fun you can have with EQ Serendipity. 


EQ Appliqued Animals Blog Hop Schedule


chick block2


Here is the Schedule for the 
EQ Appliqued Animals Blog Hop
With these fun sub-categories:
Summer Animals
Critters and Bugs
Summer “Stuff”


Monday April 22nd
Seamstobesew (Summer Animal)
Freemotionbytheriver (Critters and Bugs)
Sewincrediblycrazy (Critters and Bugs)
Beaquilter (Summer Stuff)

Tuesday April 23rd
Kissedquilts (Summer Animals)
Seamstobesew (Critters and Bugs)
Funthreads (Summer Stuff)

Wednesday April 24th
Funthreads (Summer Animals)
Patchworkbreeze (Critters and Bugs)
Beaquilter (Critters and Bugs)
Sewincrediblycrazy (Summer Stuff)

Thursday April 25th
Beaquilter (Summer Animals)
Janesquilting (Critters and Bugs)
Seamstobesew (Summer Stuff)

Friday April 26th
SewCalGal (Critters and Bugs)

4/21/2013

New Resources and New Project Ideas

My order arrived from C & T Publishing this past week. It was very exciting to open it and scope out the books I ordered on their Spring Sale. Many cost only $3 or $5. I can't wait to get started on a project from one of these books. 


I looked through Wonky One-Block Quilts by Marlous Carter and I think I want to work on one of her designs. I don't want to put a lot of thought into the fabrics I choose, I would like to simply take some from the shelves that work into her suggestion. 

I have one quilt top to finish sewing borders and I will choose some fabrics. 

Earth Day Re-Purposing Project
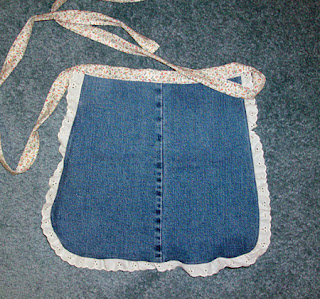
I made this little child's apron a few years ago with some leftover lace, some 2-1/2" fabric strips and one leg from a pair of jeans. 


Here is a tutorial: 


Take 1 pant leg. Fold in half lengthwise. 


Mark a 12" section, curving upward slightly from bottom center to side edges. 
Also, mark waist with a slight upward curve. Angle from side bottom edge to side top edge. 
Cut on lines. 


Make curved corners at bottom. 

               
I used a glue stick to adhere the right side of lace to the front of the apron. Allow to dry, or press with iron. 


Use glue stick on back of apron edge and turn edge hem under so it adheres to glued edge. 
Again, let dry or press with iron. 


No pins to deal with when topstitching!


Use zig-zag or decorative stitch to stitch hem under and allowing lace to protrude from under apron. 


Sew together 2 fabric strips (2-1/2" x WOF) to create a long 2-1/2" strip. Press under 1/4" on each long edge. I used water soluble basting tape on the bottom edge to help with the 1/4" seam. 


Pin center of strip to center of apron, right sides together, and sew one edge of tie to the apron waist. 


Fold seam allowance of tie to back side of apron and pin to cover seam allowance at waist. Pin the tie ends so the 1/4" seam allowances match. Fold ends in. 

Topstitch beginning at one end and along tie seam to secure. 

Add a pocket if you wish. 
One little helper will be very happy with this apron.